ROS命令管理器-RCM开发指南
介绍如何为RCM开发脚本
如何为-rcm-添加命令
创建子命令
RCM 管理的 Shell 脚本位于 CS_DEV_SCRIPT 目录下,我们可以在该目录下创建脚本或者创建子目录对脚本进行归类。为了让用户创建的子目录和脚本默认遵循 RCM 规范,RCM 通过 rcm system create 命令,并分别提供了相关选项来帮助用户创建子目录和 Shell 脚本。
# 创建一个名为 <dirname> 的子目录
$ rcm system create --dir <dirname> --dirdesc <description>
$ rcm system create -d <dirname> -dd <description>

# 创建一个名为 <scriptname> 的 Shell 脚本
$ rcm system create --dir <dirname> --dirdesc <description> -script <scriptname> -scriptdesc <description>
$ rcm system create -d <dirname> -dd <description> -s <scriptname> -sd <description>

# 创建一个名为 <scriptname> 的 Shell 脚本, 如果不指定目录,则默认在system目录下
$ rcm system create -s <scriptname> -sd <description>
创建目录
例如,我们希望创建一个名为 poker 的子目录:
$ rcm system create -d poker
#或
$ rcm system create --dir poker --dirdesc <description>

进入新创建的 poker 目录,我们会发现该目录下默认生成一个 .description 隐藏文件,该文件描述了 poker 这个子目录分类下的脚本的主要功能。RCM 自动补全系统会读取 .description 中的描述信息。
创建脚本
在上述例子的基础上,创建一个 ace.sh 脚本,我们可以执行如下命令(注:命令中无需添加 .sh 后缀):
$ rcm system create -d poker -s ace
#或
$ rcm system create --dir poker --script ace
如果不指定存放的目录,则增加到system目录下
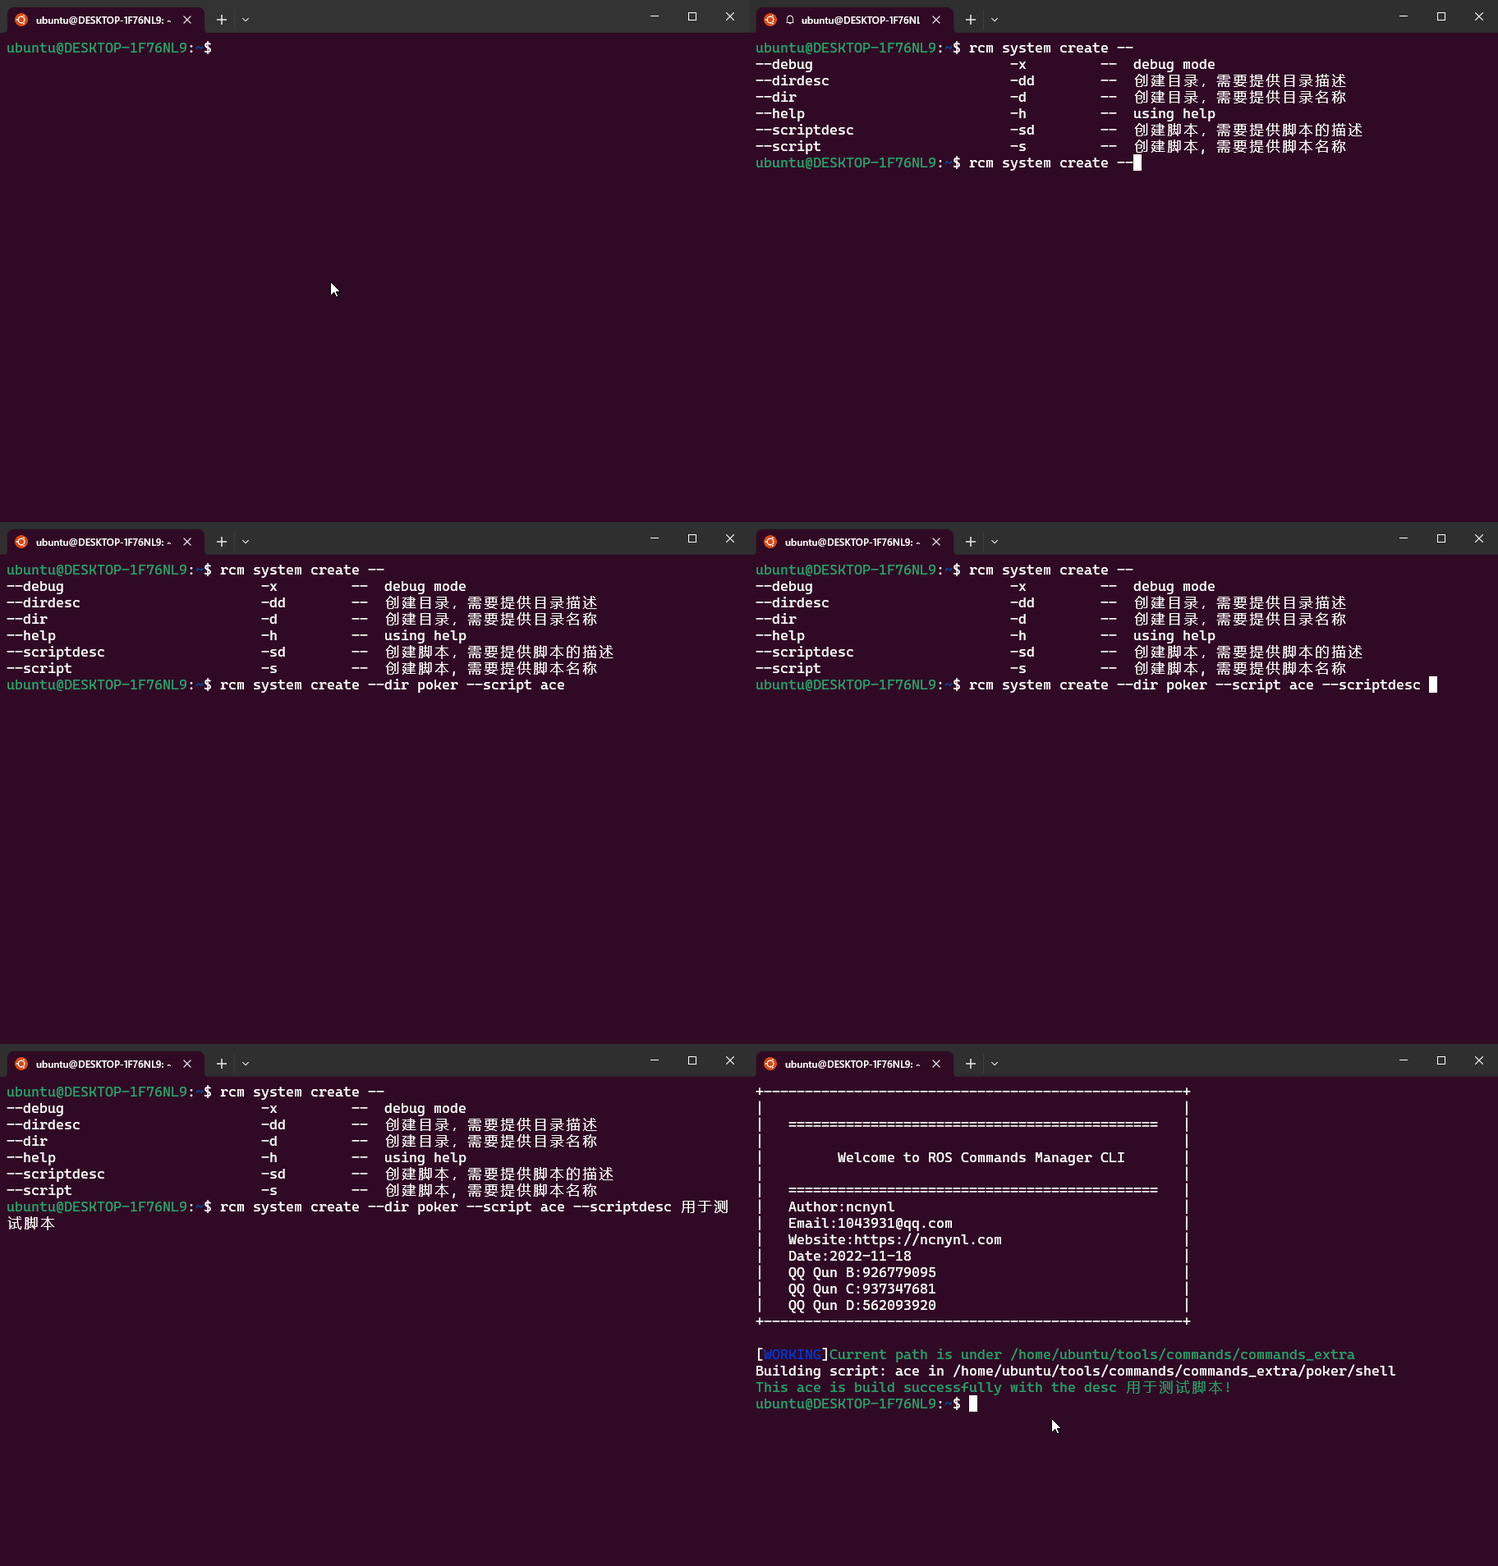
此时 RCM 在 poker 子目录下创建了一个名为 ace.sh 的脚本。这个脚本是一个模板脚本,可以直接执行。
注意:由于此时还没有对 RCM 进行编译,此时新建的子目录和脚本都还不能使用。
编辑脚本
接下来,我们对 ace.sh 脚本进行改写,使其执行能够打印 A, 2, 3, 4, 5, 6, 7, 9, 10, J, Q, K, Joker。同时支持两个选项:
--count(短选项:-c):用户需要输入一个值,表示打印的次数。无该选项则表示打印一遍。--reverse(短选项:-r):开关值选项,有该选项则表示逆序打印,无该选项则表示正序打印。
我们在 ace.sh 原有的模板的基础上进行修改。注意,有几个地方需要进行修改:
function _rcm_usage_中,我们需要修改ace的用法、描述、选项及其描述。function rcm_execute()中,我们需要将获取变量ARGS时所执行的getopt命令的输入参数选项修改为我们自定义的长选项和短选项。fucntion rcm_execute()中,我们需要在获取选项值的while循环中,将case的值修改为我们自定义的长选项和短选项。- 加入脚本核心功能的代码逻辑。
最终得到如下结果:
#!/bin/bash
################################################
# Function : Check Bash Completion
# Desc     : 用于检测自动补全功能是否完整
# Platform : ubuntu
# Version  : 1.0
# Date     : 2023-09-03
# Author   : ncnynl
# Contact  : 1043931@qq.com
# URL: https://ncnynl.com
# Licnese: MIT
# QQ Qun: 创客智造B群:926779095
# QQ Qun: 创客智造C群:937347681
# QQ Qun: 创客智造D群:562093920
################################################
export TEXTDOMAINDIR=/usr/share/locale
export TEXTDOMAIN=commands
echo "$(gettext "Check ace shell")"

# Usage of ace.sh
function _rcm_usage_() {
    cat << EOF
Usage:
    nox poker ace [--count <count>] [--reverse]

Description:
    Print poker numbers.

Option:
    --help|-h:                                          -- using help
    --debug|-x:                                         -- debug mode
    --reverse|-r:                                       -- whether to print in reverse order, or print in normal order without this option
    --count|-c:                                         -- the number of times to print, if there is no option, it will be printed once

EOF
}

##########################################################################################################################
#
# English note
# getopt command format description:
#   -o: means define short option
#       Example explanation: `ab:c::` defines three option types.
#           a There is no colon after a, which means that the defined a option is a switch type (true/false), and no additional parameters are required. Using the -a option means true.
#           b Followed by a colon, it means that the defined b option requires additional parameters, such as: `-b 30`
#           c Followed by a double colon, it means that the defined c option has an optional parameter, and the optional parameter must be close to the option, such as: `-carg` instead of `-c arg`
#   -long: means define long options
#       Example explanation: `a-long,b-long:,c-long::`. The meaning is basically the same as above.
#   "$@": a list representing the arguments, not including the command itself
#   -n: indicates information when an error occurs
#   --: A list representing the arguments themselves, not including the command itself
#       How to create a directory with -f
#       `mkdir -f` will fail because -f will be parsed as an option by mkdir
#       `mkdir -- -f` will execute successfully, -f will not be considered as an option
#
##########################################################################################################################
function rcm_execute() {
    local debug=0
    local reverse=false
    local count=1

    local ARGS=`getopt -o hxrc: --long help,debug,reverse,count: -n 'Error' -- "$@"`
    if [ $? != 0 ]; then
        error "Invalid option..." >&2;
        exit 1;
    fi
    # rearrange the order of parameters
    eval set -- "$ARGS"
    # after being processed by getopt, the specific options are dealt with below.
    while true ; do
        case "$1" in
            -h|--help)
                _rcm_usage_
                exit 1
                ;;
            -x|--debug)
                debug=1
                shift
                ;;
            -r|--reverse)
                reverse=true
                shift
                ;;
            -c|--count)
                count=$2
                shift 2
                ;;
            --)
                shift
                break
                ;;
            *)
                error "Internal Error!"
                exit 1
                ;;
        esac
    done

    if [[ $debug == 1 ]]; then
        set -x
    fi

    # start
    local poker=(A 2 3 4 5 6 7 8 9 10 J Q K Joker)

    if [[ $reverse == true ]]; then
        local length=${#poker[*]}
        local tmp=($poker)
        local i=0
        while [[ $i -lt $length ]]; do
            poker[$[$i + 1]]=$tmp[$[$length - $i]]
            i=$[i + 1]
        done
    fi

    local j=0
    while [[ $j -lt $count ]]; do
        echo ${poker[@]}
        j=$[j + 1]
    done

    if [[ $debug == 1 ]]; then
        set +x
    fi
}

# Execute current script
rcm_execute $*
编译
在创建了子目录、脚本之后,还不能直接使用,需要完成两步工作:
- 第一步:同步脚本
创建目录和脚本后,实际工作都是在开发目录中进行,可以通过安装脚本功能,把目录和脚本同步到应用目录下。执行如下命令:
cd ~/tools/commands
./install_extra.sh
或
rcm system build
- 第二步:重新加载环境,支持自动补全
同步脚本后,虽然可以通过系统命令的方式调用脚本,如上述例子中,可以通过 rcm poker ace 来调用脚本,但是却没有自动补全功能。需要通过执行 source ~/.bashrc 命令来使之生效,或者重启终端生效。
source ~/.bashrc
执行结果如下所示:

执行脚本
然后,我们就可以执行 rcm poker ace 并加上相关的选项来执行脚本。
# 顺序打印扑克牌一遍
$ rcm poker ace

# 顺序打印扑克牌两遍
$ rcm poker ace -c 2

# 逆序打印扑克牌两遍
$ rcm poker ace -c 2 -r

调试模式
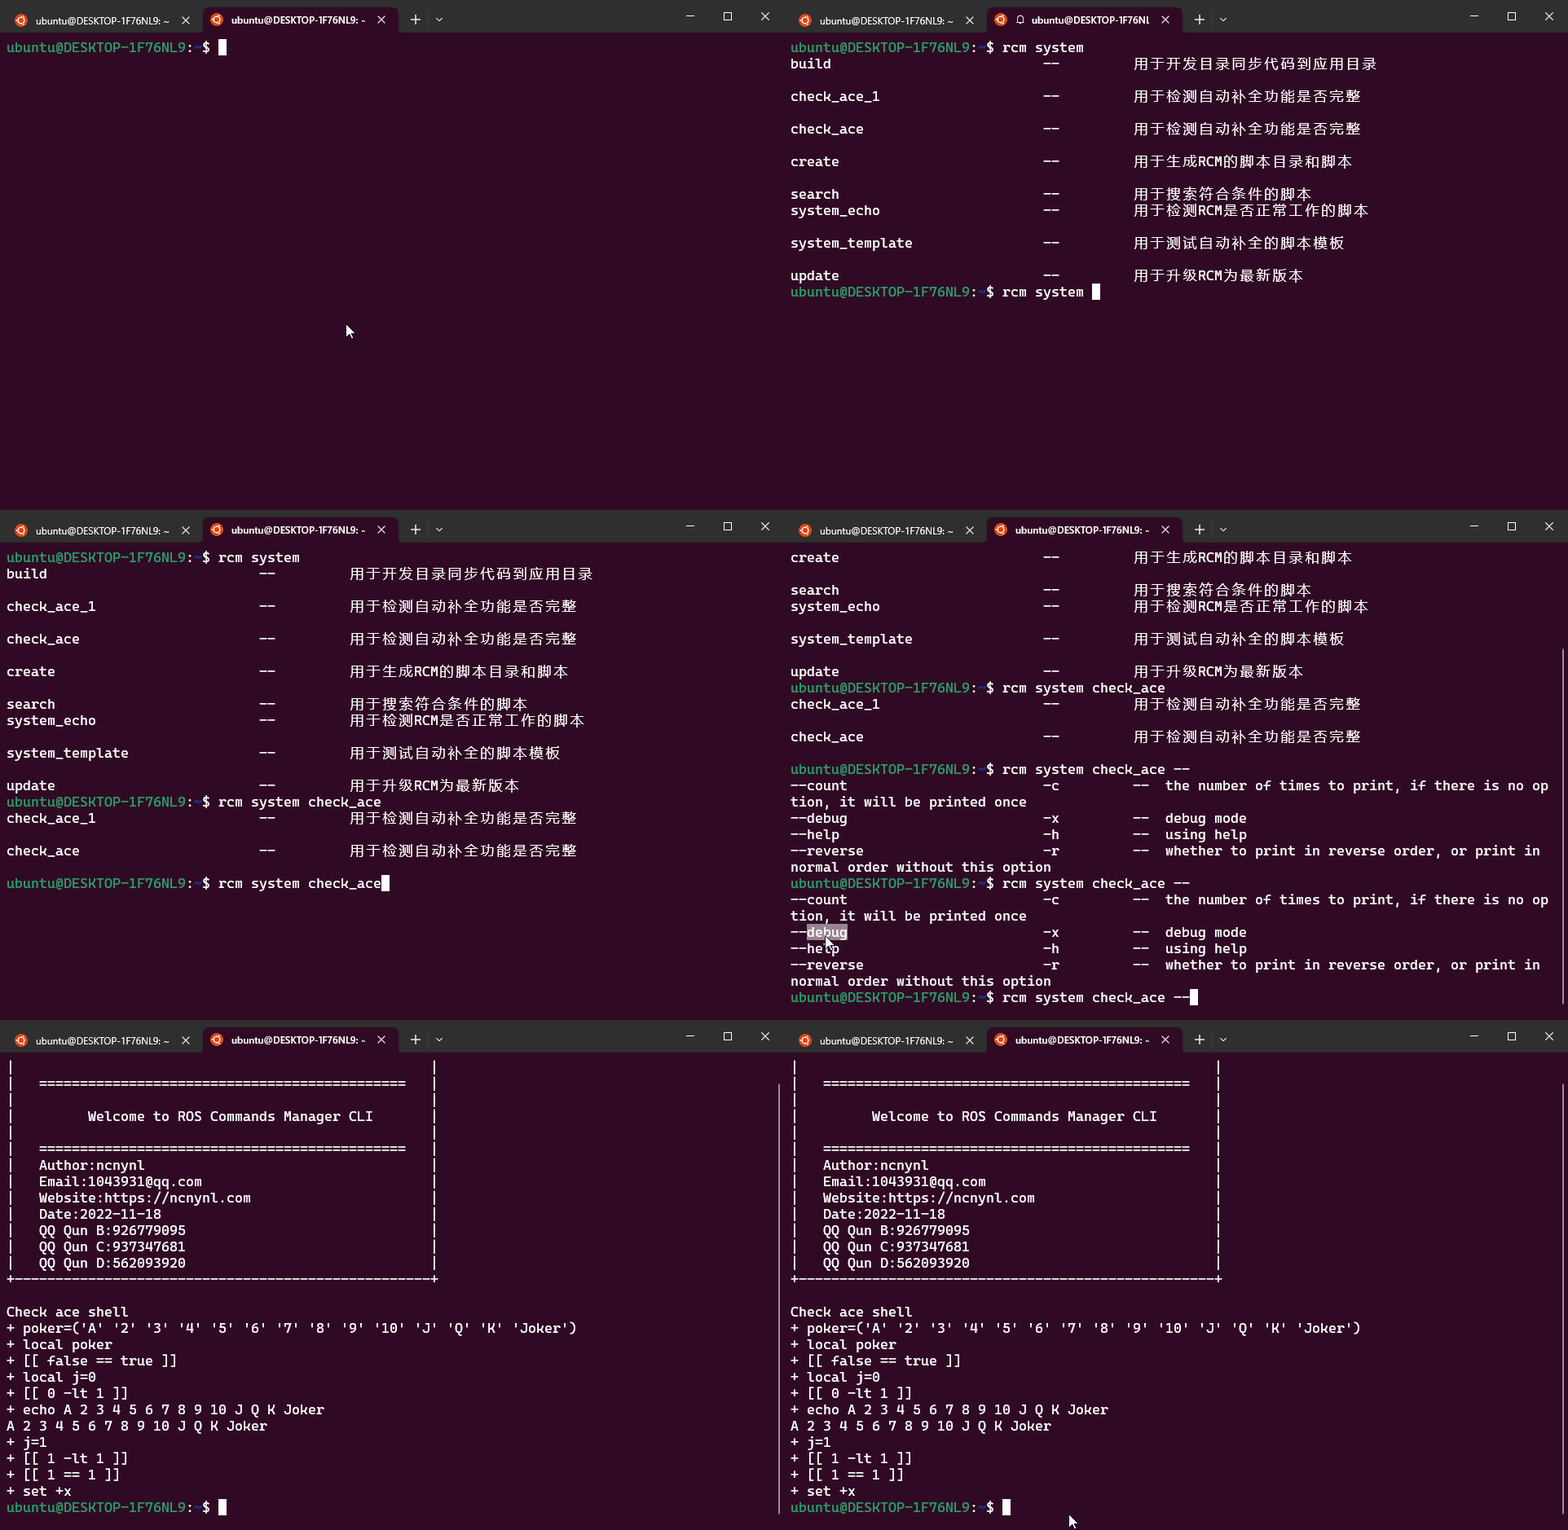
通过 rcm system create 创建的脚本,默认都支持一个 --debug 和 -x 选项,可以将脚本的执行切换成为调试模式。调试模式能够打印出脚本所执行的每一行代码及其结果,便于开发者进行开发调试。
以 rcm poker ace 为例,可以采用如下方式使用调试模式执行脚本。
帮助提示
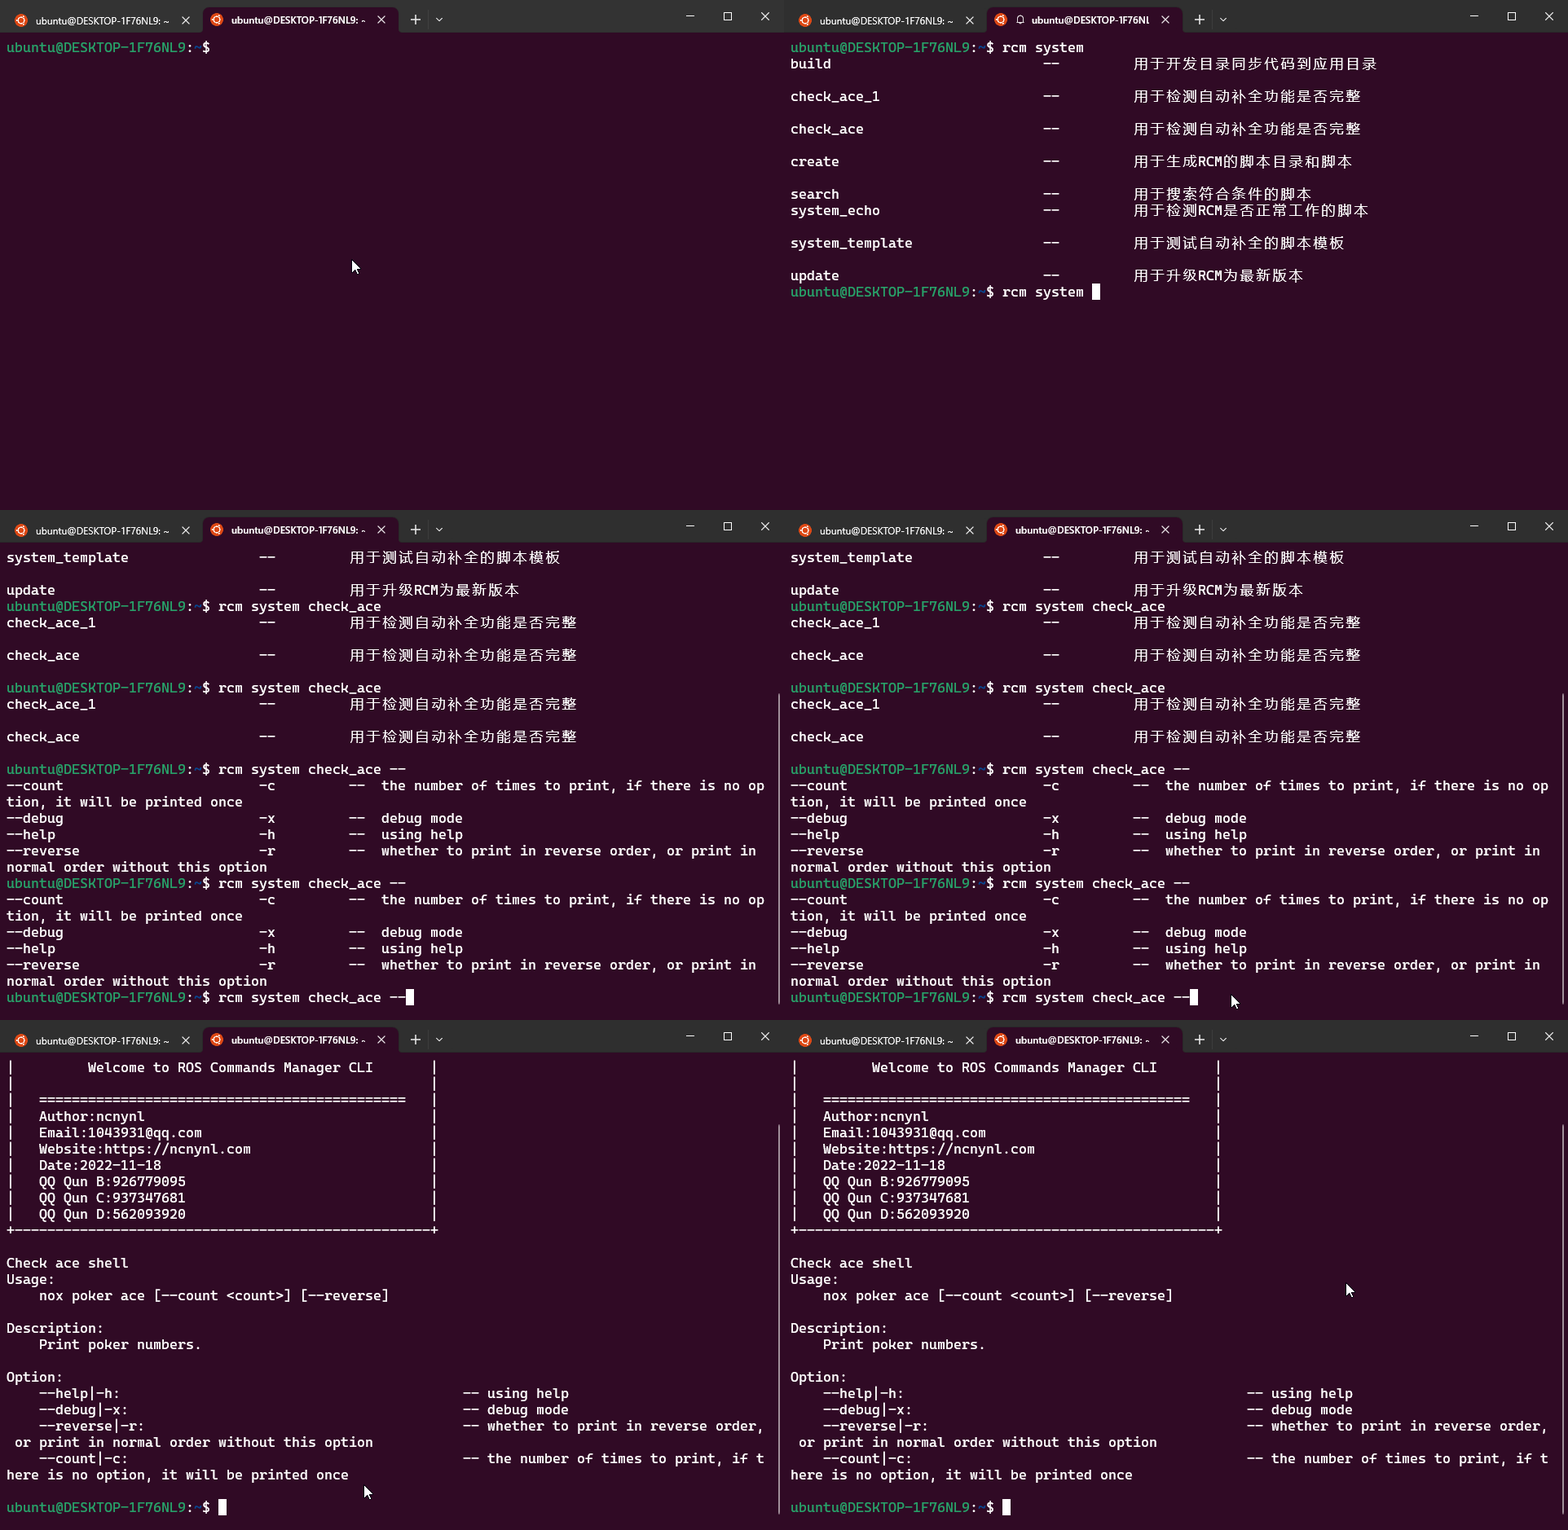
通过 rcm system create 创建的脚本,默认都支持一个 --help 和 -h 选项,可以打印出该脚本使用说明。每个脚本内部都有一个名为 _rcm_usage_ 的方法,该方法内部定义了该脚本的使用说明。
以 rcm poker ace 为例,可以采用如下方式查看脚本的使用方法。
脚本内置编辑
通过 rcm system create 创建的脚本,默认都支持一个 --edit 和 -e 选项,可以打印出该脚本使用说明。每个脚本内部都有一个名为 _rcm_edit_ 的方法,该方法内部定义了该脚本的使用说明。
以 rcm poker ace 为例,可以采用如下方式查看脚本的使用方法。

脚本内置删除
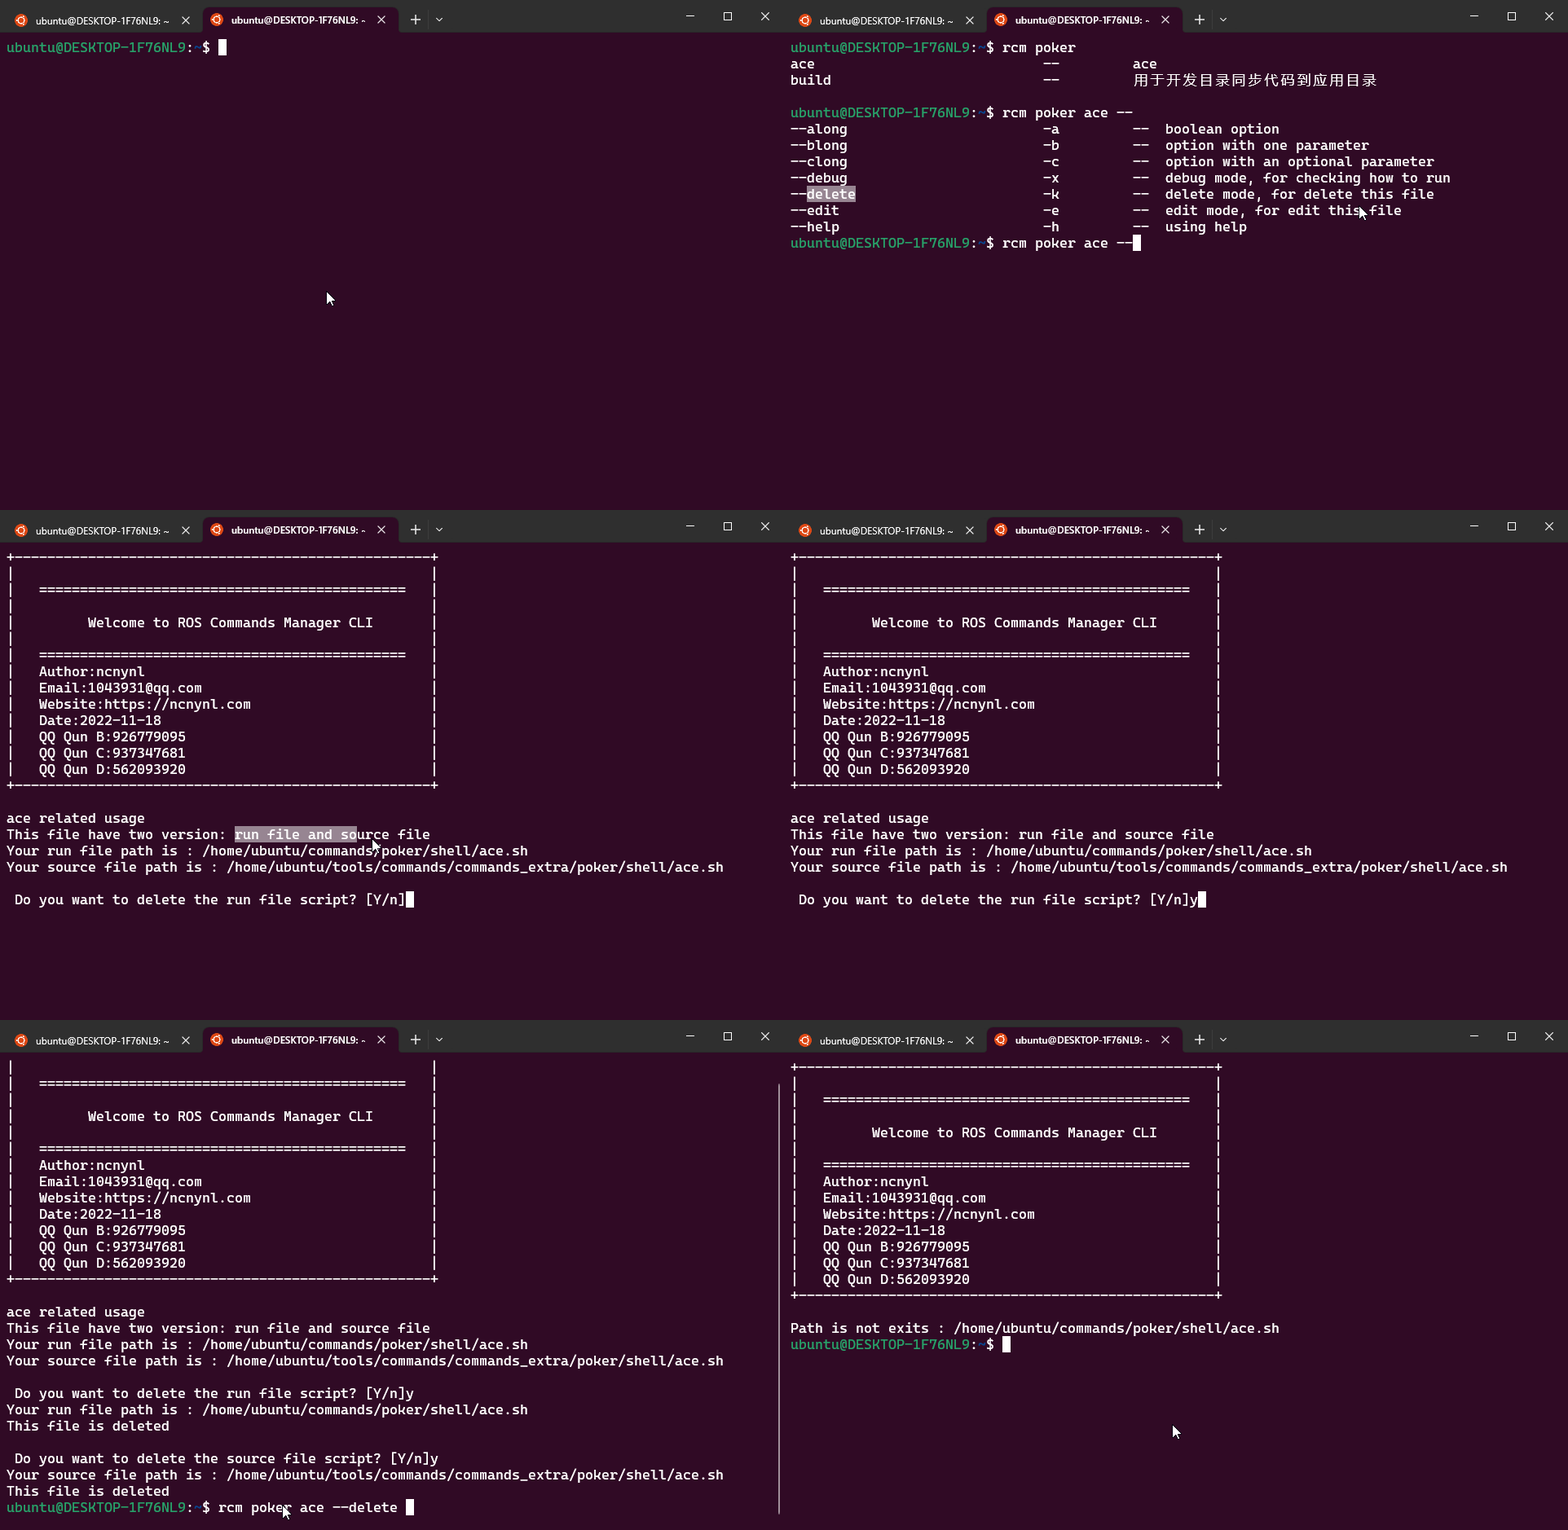
通过 rcm system create 创建的脚本,默认都支持一个 --delete 和 -k 选项,可以打印出该脚本使用说明。每个脚本内部都有一个名为 _rcm_delete_ 的方法,该方法内部定义了该脚本的使用说明。
以 rcm poker ace 为例,可以采用如下方式查看脚本的使用方法。
脚本搜索
通过 rcm system search 搜索脚本,比如你指导某个关键词,或脚本名,但是不知道在那个分类下。可以通过搜索来找到对应的执行命令。
以 ace 脚本名为例,可以采用如下方式查看脚本的使用方法。

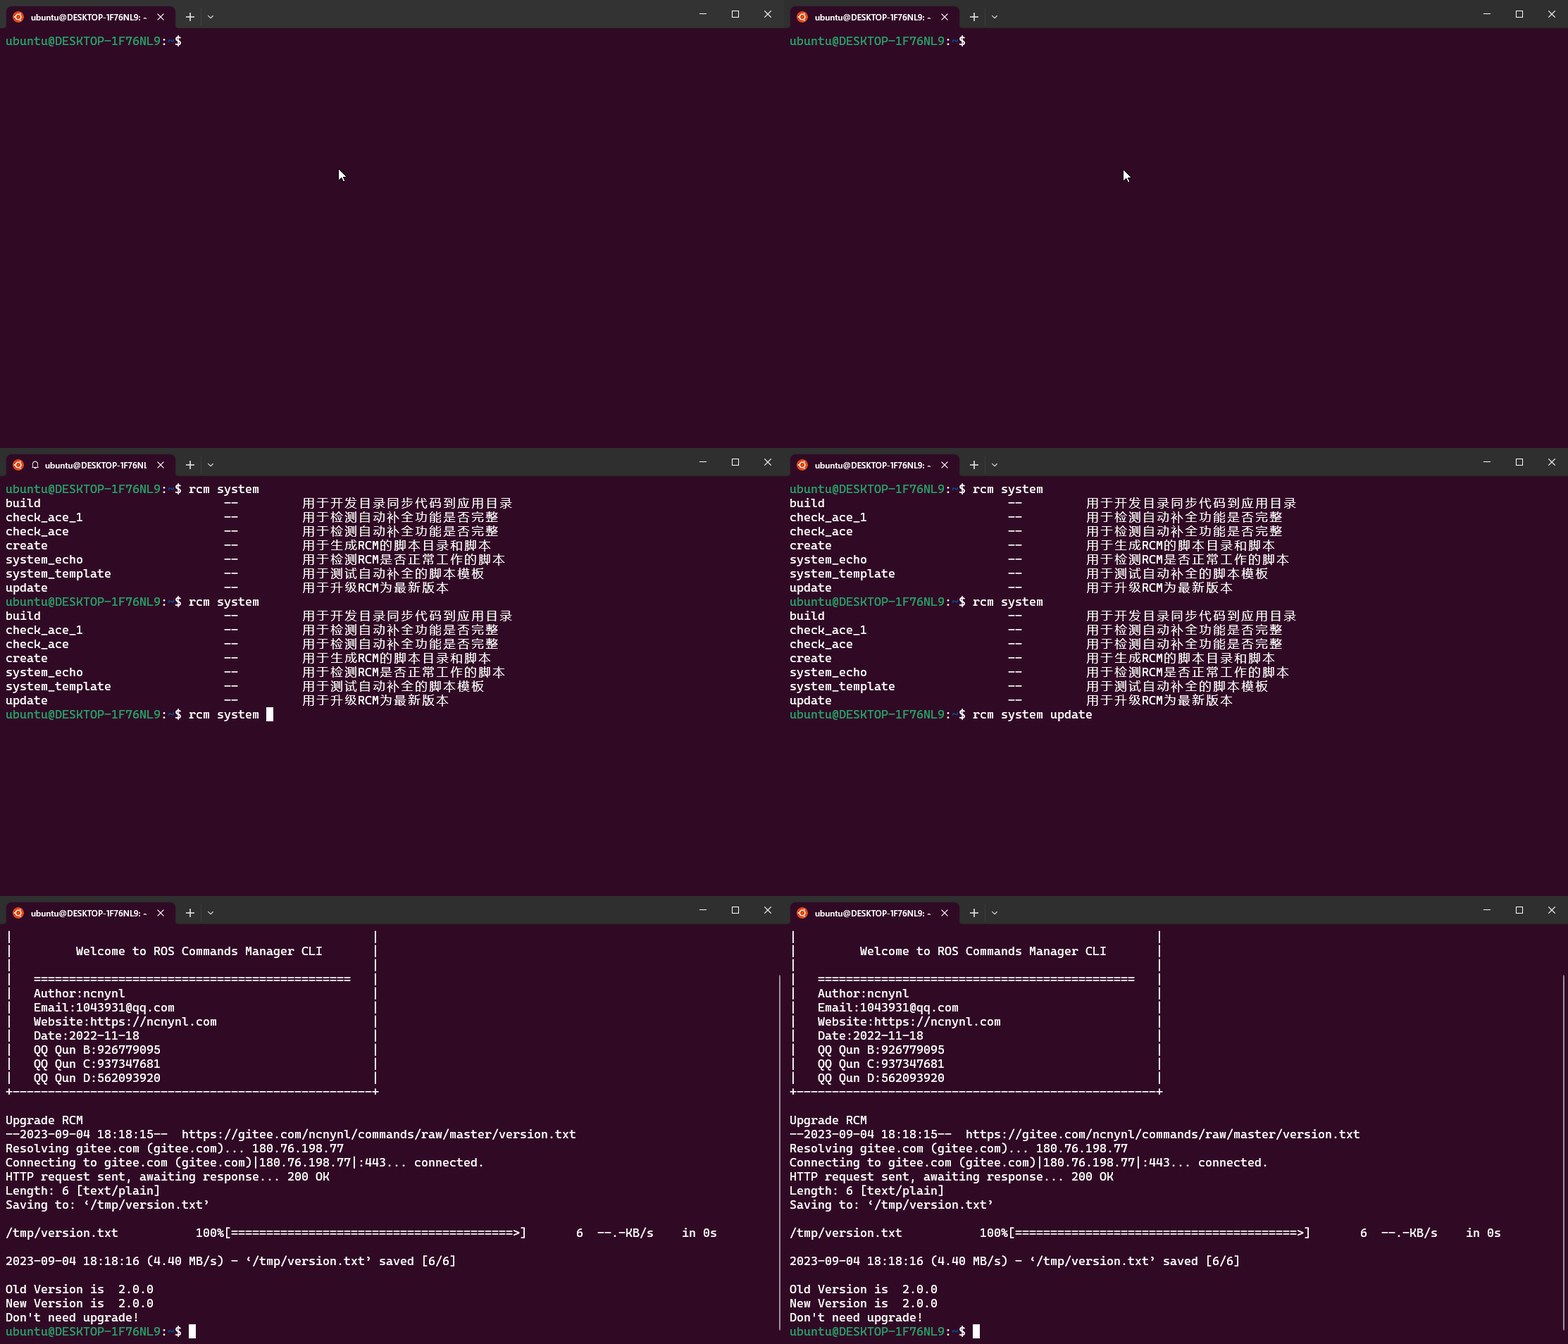
RCM升级
通过 rcm system update 主动升级RCM版本,RCM会不定期更新程序和扩展更多的脚本。可以通过更新来获取更多脚本,更多新实现的功能
开发提示
环境变量
RCM 项目在应用目录下有一个cs_variables.sh文件,该文件内容设置了一系列的环境变量,便于开发者调用,如下所示:
CS_ROOT:为应用目录的根目录CS_DEV:为开发目录的根目录CS_DEV_SCRIPT:为开发目录的脚本目录的根目录
脚本参数
RCM 为了便于补全模式使用,要求脚本的每一个参数都要有一个对应选项,从而能够充分利用自动补全功能来简化脚本的使用。
命名规范
目录名称和脚本名称使用 数字、字母、_ 进行组合,命名应尽可能短。
如:
目录:ros2_stm32
变量:cs_var="commands"
文件:cs_templates.sh
参数:--csop , --clang
- 尽可能保持脚本名称是唯一的
如:安装ros1版本ailibot的仿真文件名
install_ros1_ailibot_sim.sh

如:安装ros2版本ailibot2的仿真文件名
install_ros2_ailibot2_sim.sh
函数定义
函数定义时建议在函数名之前加上关键字 function。
私有函数名建议使用 _ 作为前缀。
一个脚本中应该只有一个公有函数cs_execute,作为入口。
函数引用
假如 hello.sh 脚本中需要引用其他脚本的功能
如1:在system目录下有check_ace.sh,可以使用 rcm system check_ace 的方式进行调用, 支持参数,并且名称唯一。
如2:在system目录下有check_ace.sh,可以使用 rcm -si check_ace 的方式进行调用, 这种方式不支持参数,并且名称唯一。
在应用目录下有一个cs_utils.sh文件定义了一系列的工具和变量。可以在脚本中引用需要的工具和变量,但是在当前脚本中要source 命令导入cs_utils.sh
例如:
常用工具函数:source ${HOME}/commands/cs_utils.sh
常用常量变量:source ${HOME}/commands/cs_variables.sh
私有脚本
RCM 仓库中的 .gitignore 文件声明 git 会忽略以 _ 为前缀的子目录或脚本。
假如我们希望 poker 作为私有子命令集合,我们可以将 poker 改为 _poker,那么其目录下的所有脚本都会变成你的私有脚本。同时也能够享有自动补全的功能。只不过,命令的调用也将发生变化,如:rcm _poker ace。

假如我们希望 ace.sh 作为私有脚本,我们可以将 ace.sh 改为 _ace.sh,那么脚本都会变成你的私有脚本。同时也能够享有自动补全的功能。只不过,命令的调用也将发生变化,如:rcm poker _ace。

编程语法
rcm 默认使用 bash 执行脚本,遵循bash相关语法即可,可以参考
- google语法规范 (https://google.github.io/styleguide/shellguide.html)
- 参考Google的Shell风格指南 (https://zh-google-styleguide.readthedocs.io/en/latest/google-shell-styleguide/contents/)
桌面版开发
桌面版
桌面版的界面是使用python开发,并通过编译来生成对应的可执行程序。项目源码位于~/tools/commands/commands_src
本地开发编译源码
本地开发后,编译相关源码,并本地测试访问,此时还不能通过rcm-gui命令来访问
#进入源码目录
cd ~/tools/commands/commands_src

#编译
./build

#文件生成在dist,可以直接执行
./dist/commands #执行
本地编译源码并同步到应用目录
本地开发好后,需要同步到应用目录才能真正可以外部访问。同步后即可通过rcm-gui来访问
# 进入开发目录下
cd ~/tools/commands/

#执行脚本
./install_src.sh

#访问
rcm-gui
共享脚本代码
参与代码开发流程
- fork repo / 克隆代码分支仓库
在gitee上操作,克隆代码到自己的仓库,比如自己的gitee上用户名为xxx,克隆后仓库空间为xxx/commands
git clone https://gitee.com/xxx/commands
- add your scripts / 增加代码到自己的分支仓库
增加相应功能后,提交自己的代码
git add .
git commit -m "desc"
- submit the scripts to your repo / 提交代码到自己的分支仓库
git push origin master
- pull request to this repo / 推送变化代码到主仓库
在gitee上操作,推送本地仓库的变化到主仓库上
- we will check your scripts / 审核相关代码
等待主仓库管理员审核代码,并合并代码到主仓库里
- all ok , merge to this repo / 合并到主仓库
代码审核后,即可合并到主仓库,功能新增成功
配置ROS1/ROS2说明
- 对于系统命令,如ls top ps等可以直接使用
- 对于ros1或ros2命令, 需要添加ros1或ros2的路径到当前用户的~/.bashrc里
- 添加ros1 路径,执行命令:
#1.x系列
rcm -s init_ros1
#2.x系列
rcm ros_easy init_ros1
- under ros_easy folder , type the ID and enter
- 添加ros2 路径,执行命令:
# 1.x系列
rcm -s init_ros2
# 2.x系列
rcm ros_easy init_ros2
- under ros_easy folder , type the ID and enter
- 对于自己的工作空间也需要添加到~/.bashrc里,要不找不到包.
- 比如你自己的工作空间walking_ws , 执行命令
echo "source ~/walking_ws/install/local_setup.bash" >> ~/.bashrc
GIT配置:
如果需要上传代码,本地需要配置用户和邮箱,例如:
- 配置GIT用户和邮箱
git config --global user.name "ncnynl"
git config --global user.email 104391@qq.com
- 上传代码
# 先同步一下是否有程序更新
git pull origin master

# 增加更改的代码
git add .

# 写上备注信息
git commit -m "desc"

# 提交代码
git push origin master
获取最新文章: 扫一扫右上角的二维码加入“创客智造”公众号


