Turtlebot3与Matlab入门教程-创建UI界面控制turtlebot3
说明:
- 介绍如何创建UI界面控制turtlebot3
步骤:
在turtlebot端:
- [turtlebot] 启动Turtlebot3
roslaunch turtlebot3_bringup turtlebot3_robot.launch
在Matlab端:
- 修改对应的ip
ipaddress = '192.168.0.93'; % IP address of your robot
运行代码turtlebot3_UI.m文件
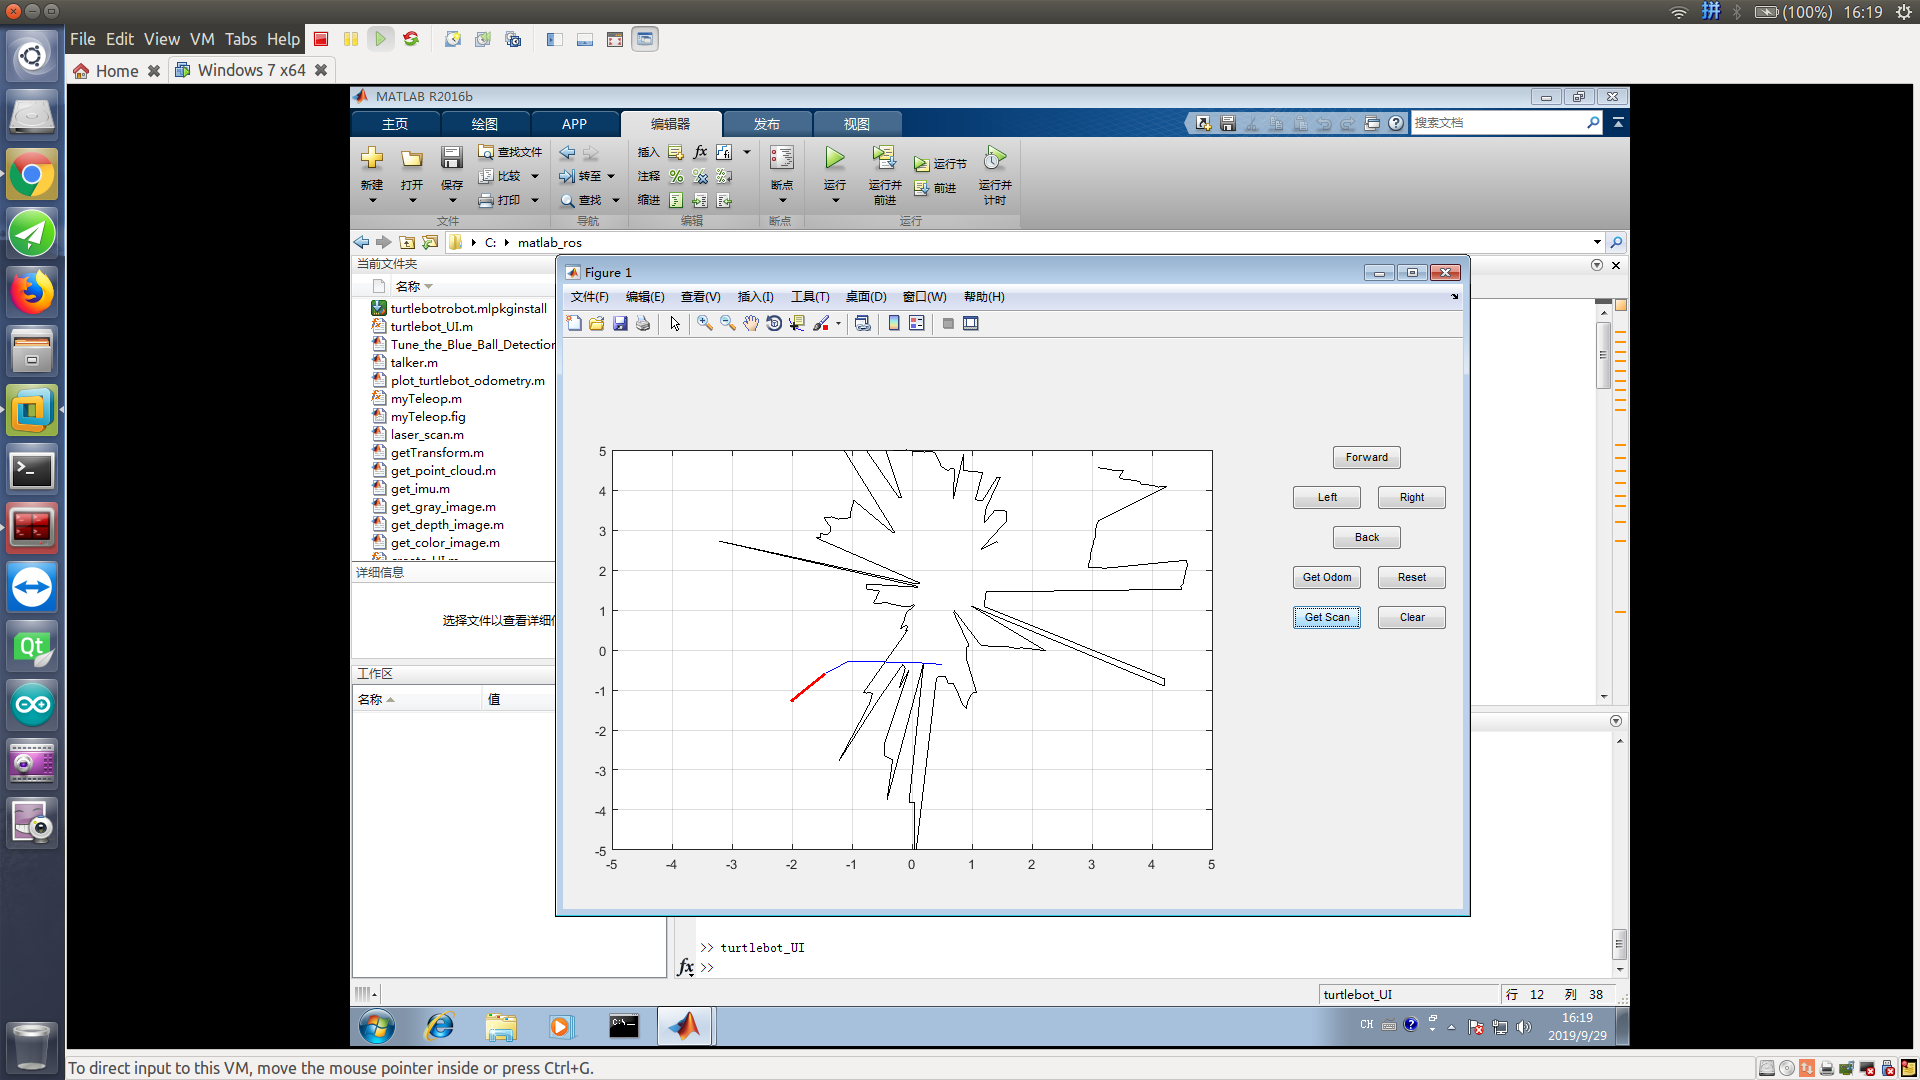
点击按键“Get Odom”,绘制一个新的里程计(蓝色)
点击按键“Get Scan”,绘制当前最新的扫描数据(黑色)
点击按键“Reset”,重置
点击按键“Clear”,清楚界面的数据
代码如下:
%Set Up the UI and Its Components
function turtlebot_UI

 f = figure('Visible','off','Position',[50,50,900,570]);

 hforward    = uicontrol('Style','pushbutton',...
             'String','Forward','Position',[770,440,70,25],...
             'Callback',@forwardCB);
hleft   = uicontrol('Style','pushbutton',...
             'String','Left','Position',[730,400,70,25],...
             'Callback',@leftCB);
hright  = uicontrol('Style','pushbutton',...
             'String','Right','Position',[815,400,70,25],...
             'Callback',@rightCB);
hback  = uicontrol('Style','pushbutton',...
             'String','Back','Position',[770,360,70,25],...
             'Callback',@backCB);
hgetOdom    = uicontrol('Style','pushbutton',...
             'String','Get Odom','Position',[730,320,70,25],...
             'Callback',@getOdomCB);
hreset    = uicontrol('Style','pushbutton',...
             'String','Reset','Position',[815,320,70,25],...
             'Callback',@resetCB);
hgetScan    = uicontrol('Style','pushbutton',...
             'String','Get Scan','Position',[730,280,70,25],...
             'Callback',@getScanCB);
hclear    = uicontrol('Style','pushbutton',...
             'String','Clear','Position',[815,280,70,25],...
             'Callback',@clearCB);
ha = axes('Units','pixels','Position',[50,60,600,400]);

% Make UI visible
    f.Visible = 'on';

%Connect to Robot
ipaddress = '192.168.0.93'; % IP address of your robot
tbot = turtlebot(ipaddress);
odomList = [];
scanPts = [];
resetOdometry(tbot);

%Specify Callback Functions for UI Buttons
  function forwardCB(source,eventdata)
        setVelocity(tbot,0.25,0)
    end

    function leftCB(source,eventdata)
        setVelocity(tbot,0,0.5)
    end

    function rightCB(source,eventdata)
        setVelocity(tbot,0,-0.5)
    end

    function backCB(source,eventdata)
        setVelocity(tbot,-0.25,0)
    end

    function getOdomCB(source,eventdata)
        plotOdom
    end
    function resetCB(source,eventdata)
        resetOdometry(tbot);
        odomList = [];
        plotOdom
    end
    function getScanCB(source,eventdata)
        plotOdom
        hold on
        plotScan
        hold off
    end
    function clearCB(source,eventdata)
        scanPts = [];
        plotOdom
    end

function plotOdom
    % Gets and plots current and saved odometry
        odom = getOdometry(tbot);
        odomList = [odomList; odom.Position(1) odom.Position(2)];
        plot(odomList(:,1),odomList(:,2),'b')
        hold on
        quiver(odom.Position(1),odom.Position(2),...
                cos(odom.Orientation(1)),sin(odom.Orientation(1)),'r',...
                'LineWidth',2)
        hold off
        xlim([-5,5])
        ylim([-5,5])
        grid on
    end

    function plotScan
    % Plots laser scan data on top of current odometry
         [scan,scanMsg] = getLaserScan(tbot);
         odom = getOdometry(tbot);
         cart = readCartesian(scanMsg);
         scanPts = [cart(:,1)+odom.Position(1) cart(:,2)+odom.Position(2)];
         yaw = odom.Orientation(1);
         R = [cos(yaw) -sin(yaw);  sin(yaw) cos(yaw)];
         scanPts = (R*scanPts')';
         plot(scanPts(:,1),scanPts(:,2),'k')
         xlim([-5,5])
         ylim([-5,5])
         grid on
    end

end
效果如下:

获取最新文章: 扫一扫右上角的二维码加入“创客智造”公众号


