ROS探索总结-38.有限状态机smach (2)
ROS探索总结-38.有限状态机smach (2)
概要
- 上一篇我们探索了SMACH有限状态机的基本概念和使用方法,本篇继续深入研究几个SMACH的典型应用。
一、数据传递
在很多场景下,状态和状态之间有一定耦合,后一个状态的工作需要使用到前一个状态中的数据,这个时候就需要在状态跳转的同时,将需要的数据传递给下一个状态。SMACH支持状态之间的数据传递。
先来运行例程看下效果:
roscore
rosrun smach_tutorials user_data.py
rosrun smach_viewer smach_viewer.py
- 启动后可以在终端中看到counter数据在打印输出:

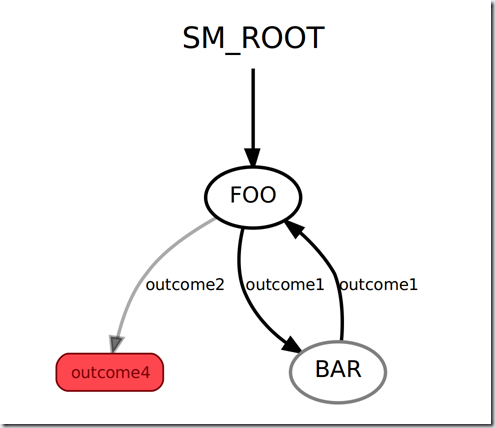
- 再来看一下状态机的结构:

- 从终端和可视化显示中只能看打有两个状态,可能并不能明确的看到数据到底是如何传递的。我们要从代码进行分析:
#!/usr/bin/env python

import rospy
import smach
import smach_ros

# define state Foo
class Foo(smach.State):
    def __init__(self):
        smach.State.__init__(self,
                             outcomes=['outcome1','outcome2'],
                             input_keys=['foo_counter_in'],
                             output_keys=['foo_counter_out'])

    def execute(self, userdata):
        rospy.loginfo('Executing state FOO')
        if userdata.foo_counter_in < 3:
            userdata.foo_counter_out = userdata.foo_counter_in + 1
            return 'outcome1'
        else:
            return 'outcome2'


# define state Bar
class Bar(smach.State):
    def __init__(self):
        smach.State.__init__(self,
                             outcomes=['outcome1'],
                             input_keys=['bar_counter_in'])

    def execute(self, userdata):
        rospy.loginfo('Executing state BAR')
        rospy.loginfo('Counter = %f'%userdata.bar_counter_in)
        return 'outcome1'


def main():
    rospy.init_node('smach_example_state_machine')

    # Create a SMACH state machine
    sm = smach.StateMachine(outcomes=['outcome4'])
    sm.userdata.sm_counter = 0

    # Open the container
    with sm:
        # Add states to the container
        smach.StateMachine.add('FOO', Foo(),
                               transitions={'outcome1':'BAR',
                                            'outcome2':'outcome4'},
                               remapping={'foo_counter_in':'sm_counter',
                                          'foo_counter_out':'sm_counter'})
        smach.StateMachine.add('BAR', Bar(),
                               transitions={'outcome1':'FOO'},
                               remapping={'bar_counter_in':'sm_counter'})

    # Create and start the introspection server
    sis = smach_ros.IntrospectionServer('my_smach_introspection_server', sm, '/SM_ROOT')
    sis.start()

    # Execute SMACH plan
    outcome = sm.execute()

    # Wait for ctrl-c to stop the application
    rospy.spin()
    sis.stop()

if __name__ == '__main__':
    main()
代码是在上一篇例程的基础上改进的,我们来找不同,看一下修改了哪些地方。
首先看状态的定义:
# define state Foo
class Foo(smach.State):
    def __init__(self):
        smach.State.__init__(self,
                             outcomes=['outcome1','outcome2'],
                             input_keys=['foo_counter_in'],
                             output_keys=['foo_counter_out'])

    def execute(self, userdata):
        rospy.loginfo('Executing state FOO')
        if userdata.foo_counter_in < 3:
            userdata.foo_counter_out = userdata.foo_counter_in + 1
            return 'outcome1'
        else:
            return 'outcome2'
我们可以发现在状态的初始化中多了两个参数:input_keys和output_keys,这两个参数就是状态的输入输出数据。
在状态的执行函数中,函数的参数也都了一个userdata参数,这就是存储状态之间需要传递数据的容器,Foo状态的输入输出数据foo_counter_in和foo_counter_out就存储在userdata中。所以在执行工作时,如果要访问、修改数据,需要使用userdata.foo_counter_out和userdata.foo_counter_in的形式。
# define state Bar
class Bar(smach.State):
    def __init__(self):
        smach.State.__init__(self,
                             outcomes=['outcome1'],
                             input_keys=['bar_counter_in'])

    def execute(self, userdata):
        rospy.loginfo('Executing state BAR')
        rospy.loginfo('Counter = %f'%userdata.bar_counter_in)
        return 'outcome1'
在Bar状态中,只需要输入数据bar_counter_in,从上边的可视化图中可以看到,Bar状态由Foo状态转换过来,所以Bar的输入数据就是Foo的输出数据。
这里你可能会有一个疑问:Foo的输出是foo_counter_out,Bar的输入是bar_counter_in,驴头不对马嘴呀!
不着急,我们继续看main函数:
sm.userdata.sm_counter = 0
- 这里定义了状态之间传递数据的变量sm_counter,怎么和Foo、Bar里的又不一样!接下来就是重点了:
# Open the container
    with sm:
        # Add states to the container
        smach.StateMachine.add('FOO', Foo(),
                               transitions={'outcome1':'BAR',
                                            'outcome2':'outcome4'},
                               remapping={'foo_counter_in':'sm_counter',
                                          'foo_counter_out':'sm_counter'})
        smach.StateMachine.add('BAR', Bar(),
                               transitions={'outcome1':'FOO'},
                               remapping={'bar_counter_in':'sm_counter'})
在状态机中添加状态时,多了一个remapping参数,如果熟悉ROS,相信你一定想到了ROS中的remapping重映射机制,类似的,这里可以将参数重映射,每个状态在设计的时候不需要考虑输入输出的变量具体是什么,只需要留下接口,使用重映射的机制就可以很方便的组合这些状态了。这个和ROS的框架原理很类似,SMACH确实和ROS和配呀!
所以这里我们将sm_counter映射为 foo_counter_in、foo_counter_out、bar_counter_in,也就是给sm_counter取了一堆别名,这样Foo和Bar里边的所有输入输出变量,其实都是sm_counter。在运行终端中可以看到,sm_counter在Foo累加后传递到Bar状态中打印出来了,该参数传递成功!
二、状态机嵌套
SMACH中的状态机是容器,支持嵌套功能,也就是说在状态机中还可以实现一个内部的状态机。
我们运行以下例程看一下状态机嵌套是什么样的:
roscore
rosrun smach_tutorials user_data.py
rosrun smach_viewer smach_viewer.py
- 终端:

- 可视化:

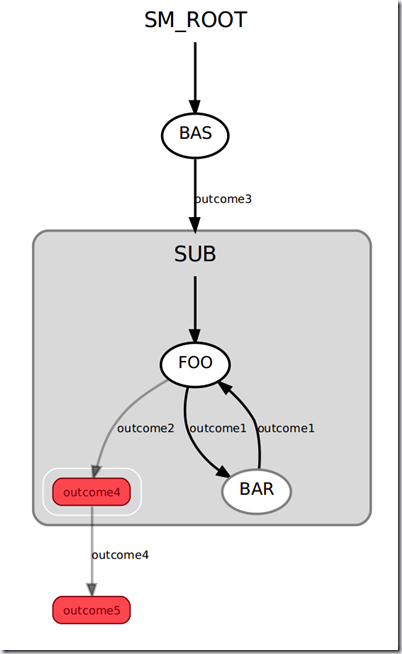
- 在可视化显示中,我们可以看到一个灰色框区域,这个就是状态SUB内部的嵌套状态机。代码实现过程如下:
#!/usr/bin/env python

import rospy
import smach
import smach_ros

# define state Foo
class Foo(smach.State):
    def __init__(self):
        smach.State.__init__(self, outcomes=['outcome1','outcome2'])
        self.counter = 0

    def execute(self, userdata):
        rospy.loginfo('Executing state FOO')
        if self.counter < 3:
            self.counter += 1
            return 'outcome1'
        else:
            return 'outcome2'

# define state Bar
class Bar(smach.State):
    def __init__(self):
        smach.State.__init__(self, outcomes=['outcome1'])

    def execute(self, userdata):
        rospy.loginfo('Executing state BAR')
        return 'outcome1'

# define state Bas
class Bas(smach.State):
    def __init__(self):
        smach.State.__init__(self, outcomes=['outcome3'])

    def execute(self, userdata):
        rospy.loginfo('Executing state BAS')
        return 'outcome3'


def main():
    rospy.init_node('smach_example_state_machine')

    # Create the top level SMACH state machine
    sm_top = smach.StateMachine(outcomes=['outcome5'])

    # Open the container
    with sm_top:

        smach.StateMachine.add('BAS', Bas(),
                               transitions={'outcome3':'SUB'})

        # Create the sub SMACH state machine
        sm_sub = smach.StateMachine(outcomes=['outcome4'])

        # Open the container
        with sm_sub:

            # Add states to the container
            smach.StateMachine.add('FOO', Foo(),
                                   transitions={'outcome1':'BAR',
                                                'outcome2':'outcome4'})
            smach.StateMachine.add('BAR', Bar(),
                                   transitions={'outcome1':'FOO'})

        smach.StateMachine.add('SUB', sm_sub,
                               transitions={'outcome4':'outcome5'})

    # Create and start the introspection server
    sis = smach_ros.IntrospectionServer('my_smach_introspection_server', sm_top, '/SM_ROOT')
    sis.start()

    # Execute SMACH plan
    outcome = sm_top.execute()

    # Wait for ctrl-c to stop the application
    rospy.spin()
    sis.stop()

if __name__ == '__main__':
    main()
- 我们新加入了一个状态Bas,三个状态Foo、Bar、Bas的定义和实现没有什么特别的,重点在main函数中。
# Create the top level SMACH state machine
    sm_top = smach.StateMachine(outcomes=['outcome5'])

    # Open the container
    with sm_top:

        smach.StateMachine.add('BAS', Bas(),
                               transitions={'outcome3':'SUB'})
- 首先定义了一个状态机sm_top,我们将这个状态机作为最顶层,并且在这个状态机中加入了一个Bas状态,该状态在初始为outcome3时会跳转到SUB状态。
# Create the sub SMACH state machine
        sm_sub = smach.StateMachine(outcomes=['outcome4'])

# Open the container
        with sm_sub:

            # Add states to the container
            smach.StateMachine.add('FOO', Foo(),
                                   transitions={'outcome1':'BAR',
                                                'outcome2':'outcome4'})
            smach.StateMachine.add('BAR', Bar(),
                                   transitions={'outcome1':'FOO'})
接着我们又定义了一个状态机sm_sub,并且还在这个状态机中添加了两个状态Foo和Bar,我们将这个状态认为是要嵌套的状态机。
目前这两个状态机还是独立的,我们需要把sm_sub嵌套在sm_top中:
smach.StateMachine.add('SUB', sm_sub,
                               transitions={'outcome4':'outcome5'})
类似于添加状态一样,状态机也可以直接使用add方法嵌套添加。
我们来回顾一下两个状态机的输入输出,sub_top中的Bas状态输出是outcome3,会跳到“SUB”状态,也就是sm_sub这个子状态机。sm_sub状态机的输出是outcome4,正好对应到了sm_top的outcome5状态。
不知道你现在是否已经绕糊涂了,回顾一下上边的结构图应该就清晰了。
三、状态并行
- SMACH还支持多个状态并列运行:
roscore
rosrun smach_tutorials concurrence.py
rosrun smach_viewer smach_viewer.py
- 终端:


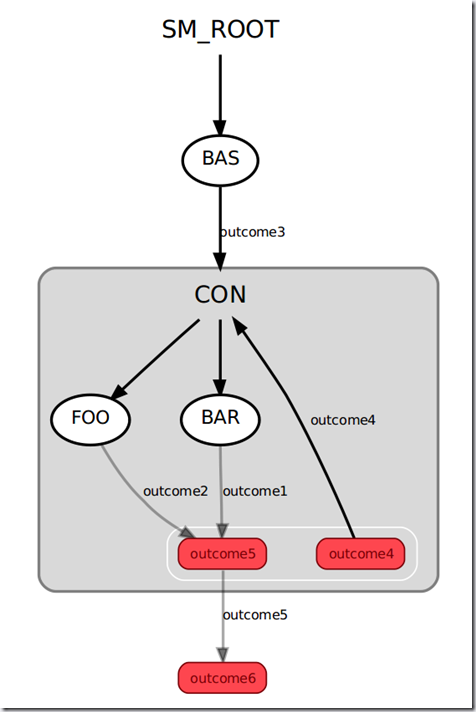
- 从图中可以看到,FOO和BAR两个状态是并列运行的,代码实现如下:
#!/usr/bin/env python

import rospy
import smach
import smach_ros

# define state Foo
class Foo(smach.State):
    def __init__(self):
        smach.State.__init__(self, outcomes=['outcome1','outcome2'])
        self.counter = 0

    def execute(self, userdata):
        rospy.loginfo('Executing state FOO')
        if self.counter < 3:
            self.counter += 1
            return 'outcome1'
        else:
            return 'outcome2'

# define state Bar
class Bar(smach.State):
    def __init__(self):
        smach.State.__init__(self, outcomes=['outcome1'])

    def execute(self, userdata):
        rospy.loginfo('Executing state BAR')
        return 'outcome1'

# define state Bas
class Bas(smach.State):
    def __init__(self):
        smach.State.__init__(self, outcomes=['outcome3'])

    def execute(self, userdata):
        rospy.loginfo('Executing state BAS')
        return 'outcome3'

def main():
    rospy.init_node('smach_example_state_machine')

    # Create the top level SMACH state machine
    sm_top = smach.StateMachine(outcomes=['outcome6'])

    # Open the container
    with sm_top:

        smach.StateMachine.add('BAS', Bas(),
                               transitions={'outcome3':'CON'})

        # Create the sub SMACH state machine
        sm_con = smach.Concurrence(outcomes=['outcome4','outcome5'],
                                   default_outcome='outcome4',
                                   outcome_map={'outcome5':
                                       { 'FOO':'outcome2',
                                         'BAR':'outcome1'}})

        # Open the container
        with sm_con:
            # Add states to the container
            smach.Concurrence.add('FOO', Foo())
            smach.Concurrence.add('BAR', Bar())

        smach.StateMachine.add('CON', sm_con,
                               transitions={'outcome4':'CON',
                                            'outcome5':'outcome6'})

    # Create and start the introspection server
    sis = smach_ros.IntrospectionServer('my_smach_introspection_server', sm_top, '/SM_ROOT')
    sis.start()

    # Execute SMACH plan
    outcome = sm_top.execute()

    # Wait for ctrl-c to stop the application
    rospy.spin()
    sis.stop()

if __name__ == '__main__':
    main()
- 这个例程从之前的嵌套状态机例程发展而来,绝大部分代码是类似的,重点还是在main函数中:
# Create the sub SMACH state machine
        sm_con = smach.Concurrence(outcomes=['outcome4','outcome5'],
                                   default_outcome='outcome4',
                                   outcome_map={'outcome5':
                                       { 'FOO':'outcome2',
                                         'BAR':'outcome1'}})

        # Open the container
        with sm_con:
            # Add states to the container
            smach.Concurrence.add('FOO', Foo())
            smach.Concurrence.add('BAR', Bar())
这里我们使用Concurrence创建了一个同步状态机,default_outcome表示该状态机的默认输出是outcome4,也就是依然会循环该状态机,重点是outcome_map参数,设置了状态机同步运行的状态跳转,当FOO状态的输出为outcome2、BAR状态的输出为outcome1时,状态机才会输出outcome5,从而跳转到顶层状态机中。
OK,今天我们又学习了SMACH的三种使用方法,总结一下这两篇对SMACH的探索总结:
- SMACH是一个功能强大的任务机有限状态机
- SMACH中的状态机是一个容器,支持状态机嵌套
- SMACH状态机在状态跳转的时候支持数据传递,也支持多个状态同步运行,同时满足条件才能跳转
- smach_viewer是个好东西!
参考资料
获取最新文章: 扫一扫右上角的二维码加入“创客智造”公众号


