Arduino库教程-有线-Master Writer/Slave receiver
Master Writer/Slave Receiver
有时候,负责人只是不知道什么时候关机!在某些情况下,设置两个(或更多!)Arduino和Genuino板彼此分享信息是有帮助的。在这个例子中,两板程序被编译为通过I2C同步串行协议和对方通讯,作为一个主写/从收配置。Arduino的几个库函数来实现这个目的。Arduino 1,主控板,被编译为请求,然后读取从唯一地址的从Arduino的数据的6个字节。一旦收到消息,可以在Arduino软件(IDE)串口监视器窗口串口里观察。
I2C协议涉及使用两线发送和接收数据:串行时钟引脚(SCL),Arduino或者Genuino主控板在一个规律的时间间隔的脉冲,和一个串行数据引脚(SDA),两个设备之间发送的数据。如时钟线从低到高的变化(称为时钟脉冲的上升沿),一个比特的信息——将会按顺序组成一个特定设备的地址和一个命令或者数据——从板上通过SDA线传输到I2C设备。当这个信息被发送(一个字节接一个字节),直到主控板在SCL上产生时序前,被调用的设备执行请求并通过同样的线和同样的时钟发送返回它的数据(如果有必要)到板上。从主到从的初始八位(即八个时钟脉冲)数据包含主控板想发送到的设备的地址。之后的字节包含主控板想读取或者写入从控板上的内存地址。
因为12C协议允许每个功能的设备有它自己唯一的地址,当主设备和从设备轮流在一个线上沟通,用上处理器的两个引脚,你的Arduino或Genuino开发板是可以和很多设备交流的。
每个从设备都有自己唯一的地址,并且主设备和从设备需要轮流在同一个数据线的通信。这样,你的Arduino或Genuino开发板是可以利用每个设备的唯一地址和很多设备交流的。
硬件要求
- 2 Arduino or Genuino Boards
- 连接线
电路
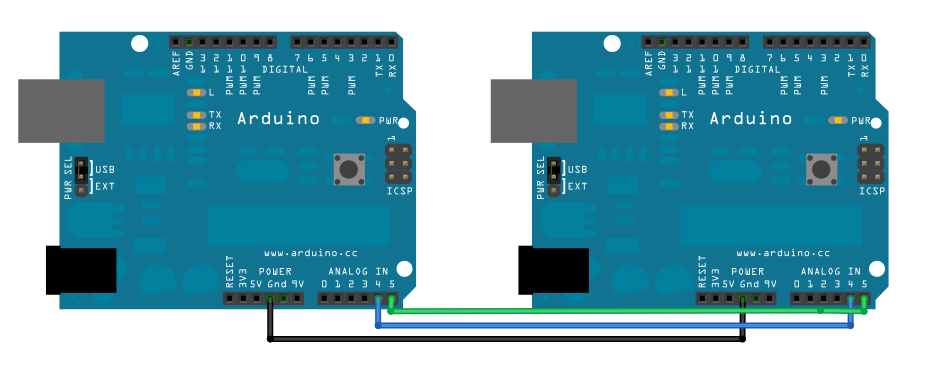
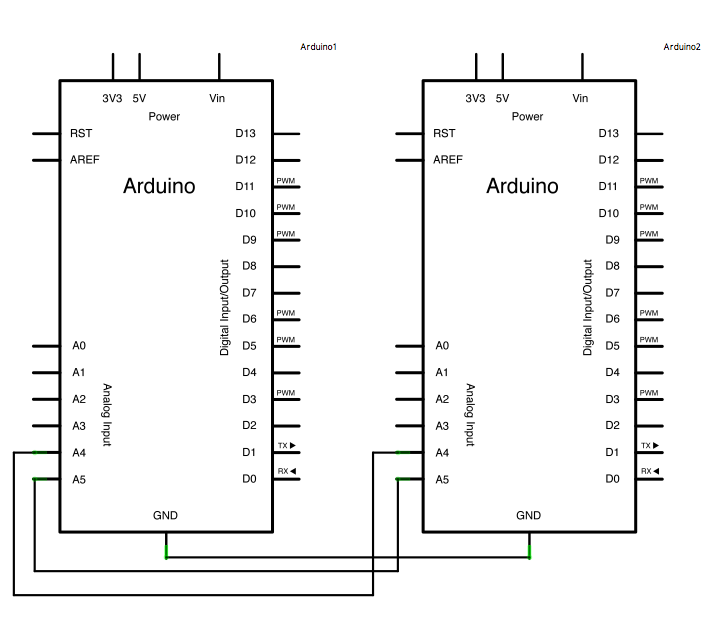
将主控板的引脚4(数据或SDA引脚)和引脚5(时钟,或SCL引脚)连接到从控板上的对应的引脚上。确保这两个板都有共同地。为了能够串行通信,主控板必须通过USB连接到您的计算机。
如果独立为开发板提供电源是一个问题,就把主控板的5V连接到从控板的VIN引脚上。

图由 Fritzing 软件绘制
原理图

样例代码
主写代码 - 编译 Arduino 1
// Wire Master Writer
// by Nicholas Zambetti <http://www.zambetti.com>

// Demonstrates use of the Wire library
// Writes data to an I2C/TWI slave device
// Refer to the "Wire Slave Receiver" example for use with this

// Created 29 March 2006

// This example code is in the public domain.


#include <Wire.h>

void setup() {
  Wire.begin(); // join i2c bus (address optional for master)
}

byte x = 0;

void loop() {
  Wire.beginTransmission(8); // transmit to device #8
  Wire.write("x is ");        // sends five bytes
  Wire.write(x);              // sends one byte
  Wire.endTransmission();    // stop transmitting

  x++;
  delay(500);
}
[Get Code]
从收代码 - 编译 Arduino 2
// Wire Slave Receiver
// by Nicholas Zambetti <http://www.zambetti.com>

// Demonstrates use of the Wire library
// Receives data as an I2C/TWI slave device
// Refer to the "Wire Master Writer" example for use with this

// Created 29 March 2006

// This example code is in the public domain.


#include <Wire.h>

void setup() {
  Wire.begin(8);                // join i2c bus with address #8
  Wire.onReceive(receiveEvent); // register event
  Serial.begin(9600);           // start serial for output
}

void loop() {
  delay(100);
}

// function that executes whenever data is received from master
// this function is registered as an event, see setup()
void receiveEvent(int howMany) {
  while (1 < Wire.available()) { // loop through all but the last
    char c = Wire.read(); // receive byte as a character
    Serial.print(c);         // print the character
  }
  int x = Wire.read();    // receive byte as an integer
  Serial.println(x);         // print the integer
}
[Get Code]
更多
- Wire.begin()
- Wire.beginTransmission()
- Wire.endTransmission()
- Wire.send()
- Wire.OnReceive()
- Wire.available()
- Wire Library – Wire库的参考网页.
- Digital Potentiometer: 控制一个模拟设备AD5171数字电位器。
- Master Reader/Slave Writer: 编程两个Arduino板之间通过I2C交流,另外一个设置为主读从写(Master Reader/Slave Sender)。
- Master Writer/Slave receiver:编程两个Arduino板之间通过I2C交流,另外一个设置为主写从收(Master Writer/Slave Receiver)。
- SFR Ranger Reader: 通过I2C读取超声波测距仪接口。
获取最新文章: 扫一扫右上角的二维码加入“创客智造”公众号


