Arduino库教程-Ethernet-Barometric Pressure Web Server
Barometric Pressure Web Server(气压网页服务器)
这个例子展示了如何使用SPI通信读取来自一个SCP1000气压传感器的数据,以及如何用你的Arduino或genuino /以太网sheild,来提交数据到网络上作为一个简单的Web服务器。采用以太网库,您的设备可以通过用刚好够的HTML(一个用来显示温度值和气压值的浏览器)响应,来应答HTTP请求。在完成您的电路和上传下面的代码后,简单地导航到您的以太网shield的IP地址,在一个浏览器里看到这个信息。
更多关于传感器怎样工作,参考 the Barometric Pressure Sensor example。
硬件要求
- Arduino 或者 Genuino 开发板
- SCP1000 压力传感突破板
- Arduino Ethernet Shield
电路
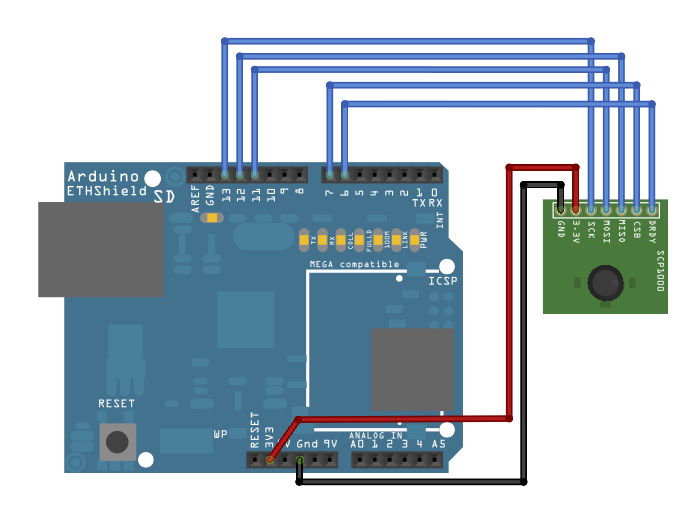
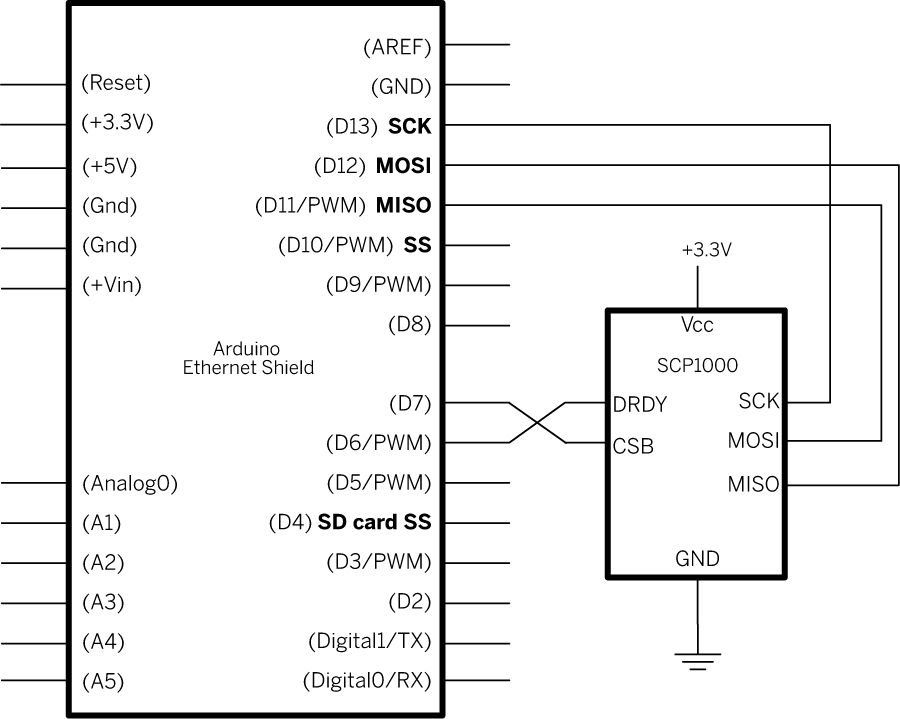
气压传感器连接到你的Arduino或genuino /以太网sheild组合板的引脚6,7和11 - 13,并通过设备的3.3V输出提供电源。连接传感器的DRDY引脚(数据准备就绪)到组合板上的数字引脚pin 6 ,而CSB引脚(片选)连接到数字引脚pin 7。你的传感器的MOSI(主出从入)引脚应该连接到数字引脚pin 11,和它对应的MISO引脚(主入从出)连接到数字引脚pin 12。最后,连接SCK引脚(对传感器的SPI时钟输入),到设备上的数字引脚pin 13,并确保两个模块共享一个共同地。
在连接你的传感器电路后,你的sheild应该用以太网电缆连接到一个网络。您需要更改程序中的网络设置以对应于您的网络。

图由 Fritzing 绘制
在上面的图片里,Arduino或genuino开发板会堆叠在以太网shield下面。
原理图

样例代码
/*
  SCP1000 Barometric Pressure Sensor Display

 Serves the output of a Barometric Pressure Sensor as a web page.
 Uses the SPI library. For details on the sensor, see:
 http://www.sparkfun.com/commerce/product_info.php?products_id=8161
 http://www.vti.fi/en/support/obsolete_products/pressure_sensors/

 This sketch adapted from Nathan Seidle's SCP1000 example for PIC:
 http://www.sparkfun.com/datasheets/Sensors/SCP1000-Testing.zip

 Circuit:
 SCP1000 sensor attached to pins 6,7, and 11 - 13:
 DRDY: pin 6
 CSB: pin 7
 MOSI: pin 11
 MISO: pin 12
 SCK: pin 13

 created 31 July 2010
 by Tom Igoe
 */

#include <Ethernet.h>
// the sensor communicates using SPI, so include the library:
#include <SPI.h>


// assign a MAC address for the Ethernet controller.
// fill in your address here:
byte mac[] = {
  0xDE, 0xAD, 0xBE, 0xEF, 0xFE, 0xED
};
// assign an IP address for the controller:
IPAddress ip(192, 168, 1, 20);


// Initialize the Ethernet server library
// with the IP address and port you want to use
// (port 80 is default for HTTP):
EthernetServer server(80);


//Sensor's memory register addresses:
const int PRESSURE = 0x1F;      //3 most significant bits of pressure
const int PRESSURE_LSB = 0x20;  //16 least significant bits of pressure
const int TEMPERATURE = 0x21;   //16 bit temperature reading

// pins used for the connection with the sensor
// the others you need are controlled by the SPI library):
const int dataReadyPin = 6;
const int chipSelectPin = 7;

float temperature = 0.0;
long pressure = 0;
long lastReadingTime = 0;

void setup() {
  // start the SPI library:
  SPI.begin();

  // start the Ethernet connection and the server:
  Ethernet.begin(mac, ip);
  server.begin();

  // initalize the  data ready and chip select pins:
  pinMode(dataReadyPin, INPUT);
  pinMode(chipSelectPin, OUTPUT);

  Serial.begin(9600);

  //Configure SCP1000 for low noise configuration:
  writeRegister(0x02, 0x2D);
  writeRegister(0x01, 0x03);
  writeRegister(0x03, 0x02);

  // give the sensor and Ethernet shield time to set up:
  delay(1000);

  //Set the sensor to high resolution mode tp start readings:
  writeRegister(0x03, 0x0A);

}

void loop() {
  // check for a reading no more than once a second.
  if (millis() - lastReadingTime > 1000) {
    // if there's a reading ready, read it:
    // don't do anything until the data ready pin is high:
    if (digitalRead(dataReadyPin) == HIGH) {
      getData();
      // timestamp the last time you got a reading:
      lastReadingTime = millis();
    }
  }

  // listen for incoming Ethernet connections:
  listenForEthernetClients();
}


void getData() {
  Serial.println("Getting reading");
  //Read the temperature data
  int tempData = readRegister(0x21, 2);

  // convert the temperature to celsius and display it:
  temperature = (float)tempData / 20.0;

  //Read the pressure data highest 3 bits:
  byte  pressureDataHigh = readRegister(0x1F, 1);
  pressureDataHigh &= 0b00000111; //you only needs bits 2 to 0

  //Read the pressure data lower 16 bits:
  unsigned int pressureDataLow = readRegister(0x20, 2);
  //combine the two parts into one 19-bit number:
  pressure = ((pressureDataHigh << 16) | pressureDataLow) / 4;

  Serial.print("Temperature: ");
  Serial.print(temperature);
  Serial.println(" degrees C");
  Serial.print("Pressure: " + String(pressure));
  Serial.println(" Pa");
}

void listenForEthernetClients() {
  // listen for incoming clients
  EthernetClient client = server.available();
  if (client) {
    Serial.println("Got a client");
    // an http request ends with a blank line
    boolean currentLineIsBlank = true;
    while (client.connected()) {
      if (client.available()) {
        char c = client.read();
        // if you've gotten to the end of the line (received a newline
        // character) and the line is blank, the http request has ended,
        // so you can send a reply
        if (c == '\n' && currentLineIsBlank) {
          // send a standard http response header
          client.println("HTTP/1.1 200 OK");
          client.println("Content-Type: text/html");
          client.println();
          // print the current readings, in HTML format:
          client.print("Temperature: ");
          client.print(temperature);
          client.print(" degrees C");
          client.println("<br />");
          client.print("Pressure: " + String(pressure));
          client.print(" Pa");
          client.println("<br />");
          break;
        }
        if (c == '\n') {
          // you're starting a new line
          currentLineIsBlank = true;
        } else if (c != '\r') {
          // you've gotten a character on the current line
          currentLineIsBlank = false;
        }
      }
    }
    // give the web browser time to receive the data
    delay(1);
    // close the connection:
    client.stop();
  }
}


//Send a write command to SCP1000
void writeRegister(byte registerName, byte registerValue) {
  // SCP1000 expects the register name in the upper 6 bits
  // of the byte:
  registerName <<= 2;
  // command (read or write) goes in the lower two bits:
  registerName |= 0b00000010; //Write command

  // take the chip select low to select the device:
  digitalWrite(chipSelectPin, LOW);

  SPI.transfer(registerName); //Send register location
  SPI.transfer(registerValue); //Send value to record into register

  // take the chip select high to de-select:
  digitalWrite(chipSelectPin, HIGH);
}


//Read register from the SCP1000:
unsigned int readRegister(byte registerName, int numBytes) {
  byte inByte = 0;           // incoming from  the SPI read
  unsigned int result = 0;   // result to return

  // SCP1000 expects the register name in the upper 6 bits
  // of the byte:
  registerName <<=  2;
  // command (read or write) goes in the lower two bits:
  registerName &= 0b11111100; //Read command

  // take the chip select low to select the device:
  digitalWrite(chipSelectPin, LOW);
  // send the device the register you want to read:
  int command = SPI.transfer(registerName);
  // send a value of 0 to read the first byte returned:
  inByte = SPI.transfer(0x00);

  result = inByte;
  // if there's more than one byte returned,
  // shift the first byte then get the second byte:
  if (numBytes > 1) {
    result = inByte << 8;
    inByte = SPI.transfer(0x00);
    result = result | inByte;
  }
  // take the chip select high to de-select:
  digitalWrite(chipSelectPin, HIGH);
  // return the result:
  return (result);
}
[Get Code]
更多
- Arduino Ethernet Shield – 产品描述。
- Getting started with the Ethernet Shield – 在几分钟内启动所有东西。
- Ethernet library – 以太网库的参考手册
- Arduino Ethernet Shield – 产品描述。
- Getting started with the Ethernet Shield – 在几分钟内设置所有东西。
- Ethernet library – 以太网库的参考手册
- ChatServer - 一个简单的服务器,用来发送所有传入的信息到所有连接的客户端。
- WebClient – 查询网络,并通过串口监视器得到答案
- WebClientRepeating - 如何用以太网shield重复HTTP请求。
- WebServer - 一个简单的Web服务器,用来显示模拟输入的值。
- DhcpAddressPrinter – 获取DHCP地址,并打印出到串口监视器。
- DhcpChatServer – 连接到一个telnet服务器,并打印所有收到的信息到串口监视器上。用DHCP。
- TelnetClient - 连接到一个telnet服务器,并打印所有收到的信息到串口监视器上。
- BarometricPressureWebServer – 用SPI从压力传感器读取的Post数据。
- UDPSendReceiveString - 通过UDP协议(通用数据包)发送和接收文本字符串。
- UdpNtpClient - 查询一个网络时间协议(NTP)服务器,并通过串口服务器监视器获取这个信息。
获取最新文章: 扫一扫右上角的二维码加入“创客智造”公众号


