Arduino内置教程-控制结构-Switch Case 2
Switch (case) 声明, 附带串口输入
一个if声明允许你选择两个分开的选项,真或假。当有超过2个的选项,你可以用多个if声明,或者你可以用switch声明。switch允许你选择多个选项。
这个教程示范怎样用switch根据收到的字节数据来打开多个LED灯中的一个。并且根据字符a,b,c,d,e来打开特定的LED灯。
硬件要求
- Arduino 或者 Genuino 开发板
- 5 LEDs
- 5 220 ohm 电阻
- 连接线
- 面包板
电路
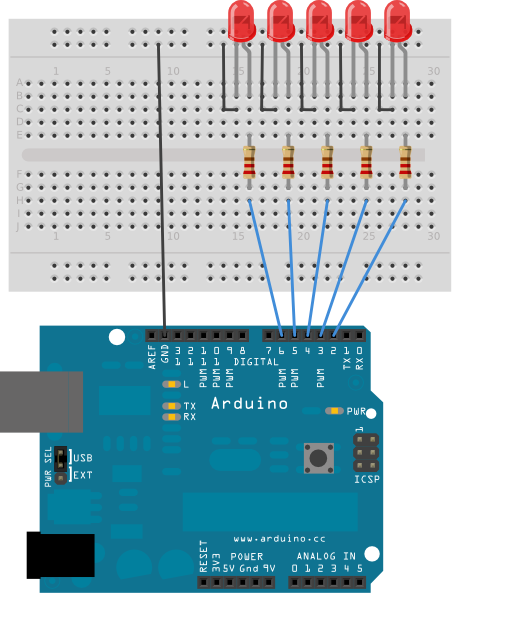
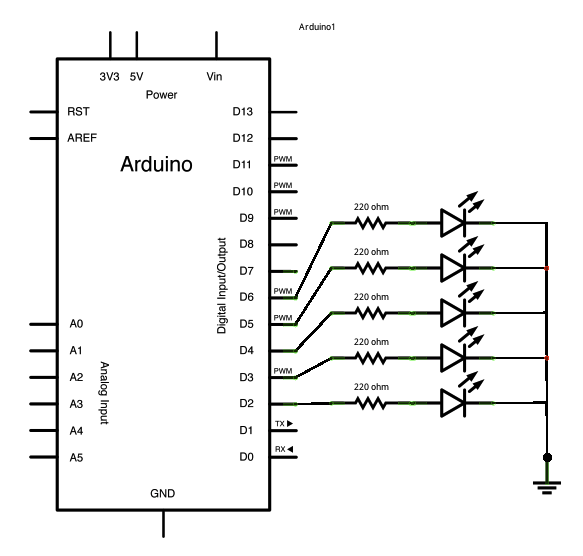
5个LED灯通过串联的220 ohm电阻连接到数字引脚pin 2,3,4,5,6。
为了使程序工作,你的开发板需要连接到电脑。在Arduino IDE上打开串口监视器,并且发送字符 a,b,c,d,e来点亮相应的LED灯,或者其他东西来关闭它们。

图为Fritzing软件绘制。
原理图

样例代码
/*
  Switch statement  with serial input

 Demonstrates the use of a switch statement.  The switch
 statement allows you to choose from among a set of discrete values
 of a variable.  It's like a series of if statements.

 To see this sketch in action, open the Serial monitor and send any character.
 The characters a, b, c, d, and e, will turn on LEDs.  Any other character will turn
 the LEDs off.

 The circuit:
 * 5 LEDs attached to digital pins 2 through 6 through 220-ohm resistors

 created 1 Jul 2009
 by Tom Igoe

This example code is in the public domain.

 http://www.arduino.cc/en/Tutorial/SwitchCase2
 */

void setup() {
  // initialize serial communication:
  Serial.begin(9600);
  // initialize the LED pins:
  for (int thisPin = 2; thisPin < 7; thisPin++) {
    pinMode(thisPin, OUTPUT);
  }
}

void loop() {
  // read the sensor:
  if (Serial.available() > 0) {
    int inByte = Serial.read();
    // do something different depending on the character received.
    // The switch statement expects single number values for each case;
    // in this exmaple, though, you're using single quotes to tell
    // the controller to get the ASCII value for the character.  For
    // example 'a' = 97, 'b' = 98, and so forth:

    switch (inByte) {
      case 'a':
        digitalWrite(2, HIGH);
        break;
      case 'b':
        digitalWrite(3, HIGH);
        break;
      case 'c':
        digitalWrite(4, HIGH);
        break;
      case 'd':
        digitalWrite(5, HIGH);
        break;
      case 'e':
        digitalWrite(6, HIGH);
        break;
      default:
        // turn all the LEDs off:
        for (int thisPin = 2; thisPin < 7; thisPin++) {
          digitalWrite(thisPin, LOW);
        }
    }
  }
}
更多
- serial.begin()
- serial.read()
- serial.available()
- switch() case
- digitalWrite()
- 数组:一个在For循环的变量举例了怎样使用一个数组。
- IfStatementConditional:通过for循环来控制多个LED灯
- If声明条件:使用一个‘if 声明’,通过改变输入条件来改变输出条件
- Switch Case:怎样在非连续的数值里选择。
- Switch Case 2:第二个switch-case的例子,展示怎样根据在串口收到的字符来采取不同的行为
- While 声明条件:当一个按键被读取,怎样用一个while循环来校准一个传感器。
获取最新文章: 扫一扫右上角的二维码加入“创客智造”公众号


