Arduino内置教程-通讯-可视颜色混合器
可视颜色混合器
这个例子示范了怎么从Arduino开发板发送多个数值到电脑。从三个电位计读到的数值被用来设置Processing或Max/MSP的后台颜色的红,绿和蓝零件。
硬件要求
- Arduino or Genuino 开发板
- 3 模拟传感器 (电位计, 光敏电阻, FSR,等等)
- 3 10K ohm 电阻
- 连接线
- 开发板
软件要求
- Processing 或者 Max/MSP version 5
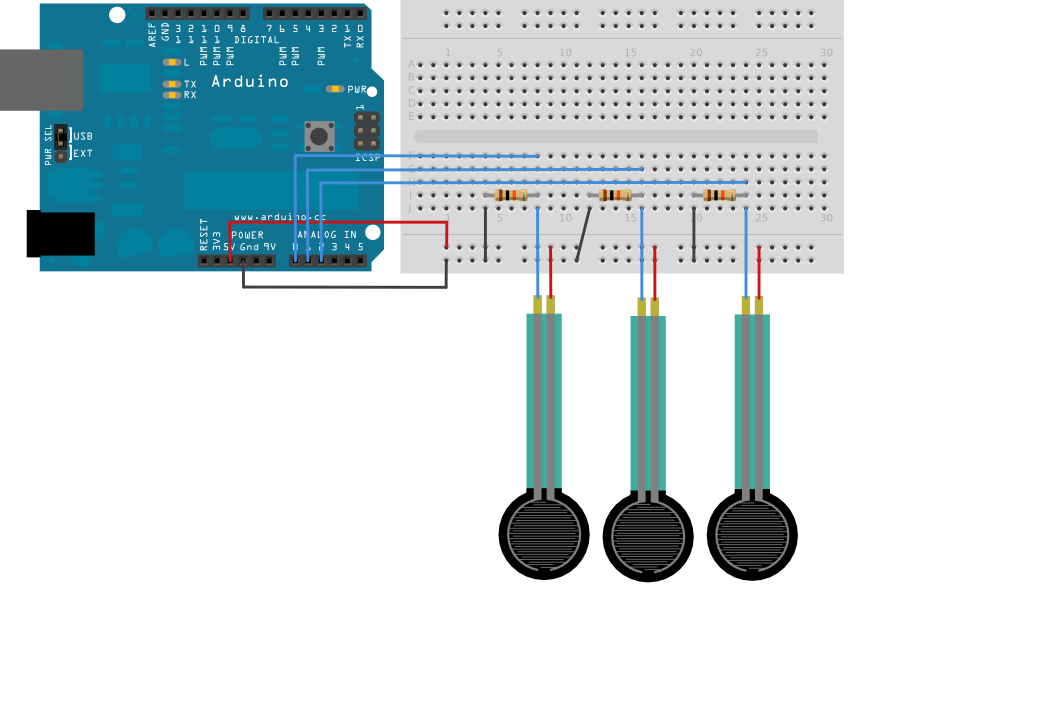
电路
连接模拟传感器到模拟引脚pin0,1,2。
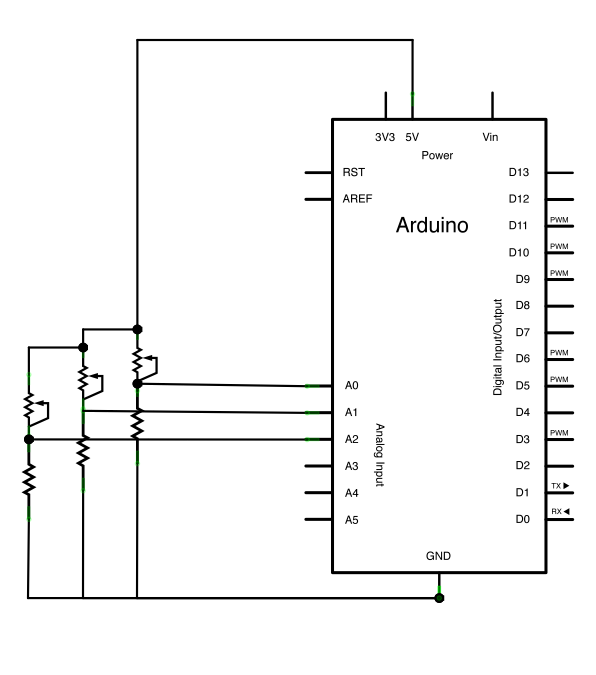
这个电路用三个分压器来产生来自压力传感电阻的模拟电压。一个分压器有两个电阻串联,以便合理地分压。

原理图

样例代码
这个传感值作为ASCII-encoded 数字从Arduino发送到电脑。这意味着每个数字是用ASCII字符“0”到“9”发送的。以“234”为例子,共发送了三个字节:ASCII "2" (binary value 50), ASCII "3" (binary value 51), 和ASCII "4" (binary value 52).
/*
  This example reads three analog sensors (potentiometers are easiest)
 and sends their values serially. The Processing and Max/MSP programs at the bottom
 take those three values and use them to change the background color of the screen.

 The circuit:
 * potentiometers attached to analog inputs 0, 1, and 2

 http://www.arduino.cc/en/Tutorial/VirtualColorMixer

 created 2 Dec 2006
 by David A. Mellis
 modified 30 Aug 2011
 by Tom Igoe and Scott Fitzgerald

  This example code is in the public domain.
 */

const int redPin = A0;      // sensor to control red color
const int greenPin = A1;    // sensor to control green color
const int bluePin = A2;     // sensor to control blue color

void setup() {
  Serial.begin(9600);
}

void loop() {
  Serial.print(analogRead(redPin));
  Serial.print(",");
  Serial.print(analogRead(greenPin));
  Serial.print(",");
  Serial.println(analogRead(bluePin));
}

/* Processing code for this example

//  This example code is in the public domain.

import processing.serial.*;

float redValue = 0;        // red value
float greenValue = 0;      // green value
float blueValue = 0;       // blue value

Serial myPort;

void setup() {
  size(200, 200);

  // List all the available serial ports
  // if using Processing 2.1 or later, use Serial.printArray()
  println(Serial.list());

  // I know that the first port in the serial list on my mac
  // is always my  Arduino, so I open Serial.list()[0].
  // Open whatever port is the one you're using.
  myPort = new Serial(this, Serial.list()[0], 9600);
  // don't generate a serialEvent() unless you get a newline character:
  myPort.bufferUntil('\n');
}

void draw() {
  // set the background color with the color values:
  background(redValue, greenValue, blueValue);
}

void serialEvent(Serial myPort) {
  // get the ASCII string:
  String inString = myPort.readStringUntil('\n');

  if (inString != null) {
    // trim off any whitespace:
    inString = trim(inString);
    // split the string on the commas and convert the
    // resulting substrings into an integer array:
    float[] colors = float(split(inString, ","));
    // if the array has at least three elements, you know
    // you got the whole thing.  Put the numbers in the
    // color variables:
    if (colors.length >=3) {
      // map them to the range 0-255:
      redValue = map(colors[0], 0, 1023, 0, 255);
      greenValue = map(colors[1], 0, 1023, 0, 255);
      blueValue = map(colors[2], 0, 1023, 0, 255);
    }
  }
}

 */

/* Max/MSP patch for this example

 ----------begin_max5_patcher----------
1512.3oc4Z00aaaCE8YmeED9ktB35xOjrj1aAsXX4g8xZQeYoXfVh1gqRjdT
TsIsn+2K+PJUovVVJ1VMdCAvxThV7bO7b48dIyWtXxzkxaYkSA+J3u.Sl7kK
lLwcK6MlT2dxzB5so4zRW2lJXeRt7elNy+HM6Vs61uDDzbOYkNmo02sg4euS
4BSede8S2P0o2vEq+aEKU66PPP7b3LPHDauPvyCmAvv4v6+M7L2XXF2WfCaF
lURgVPKbCxzKUbZdySDUEbgABN.ia08R9mccGYGn66qGutNir27qWbg8iY+7
HDRx.Hjf+OPHCQgPdpQHoxhBlwB+QF4cbkthlCRk4REnfeKScs3ZwaugWBbj
.PS+.qDPAkZkgPlY5oPS4By2A5aTLFv9pounjsgpnZVF3x27pqtBrRpJnZaa
C3WxTkfUJYA.BzR.BhIy.ehquw7dSoJCsrlATLckR.nhLPNWvVwL+Vp1LHL.
SjMG.tRaG7OxT5R2c8Hx9B8.wLCxVaGI6qnpj45Ug84kL+6YIM8CqUxJyycF
7bqsBRULGvwfWyRMyovElat7NvqoejaLm4f+fkmyKuVTHy3q3ldhB.WtQY6Z
x0BSOeSpTqA+FW+Yy3SyybH3sFy8p0RVCmaMpTyX6HdDZ2JsPbfSogbBMueH
JLd6RMBdfRMzPjZvimuWIK2XgFA.ZmtfKoh0Sm88qc6OF4bDQ3P6kEtF6xej
.OkjD4H5OllyS+.3FlhY0so4xRlWqyrXErQpt+2rsnXgQNZHZgmMVzEofW7T
S4zORQtgIdDbRHrObRzSMNofUVZVcbKbhQZrSOo934TqRHIN2ncr7BF8TKR1
tHDqL.PejLRRPKMR.pKFAkbtDa+UOvsYsIFH0DYsTCjqZ66T1CmGeDILLpSm
myk0SdkOKh5LUr4GbWwRYdW7fm.BvDmzHnSdH3biGpSbxxDNJoGDAD1ChH7L
I0DaloOTBLvkO7zPs5HJnKNoGAXbol5eytUhfyiSfnjE1uAq+Fp0a+wygGwR
q3ZI8.psJpkpJnyPzwmXBj7Sh.+bNvVZxlcKAm0OYHIxcIjzEKdRChgO5UMf
LkMPNN0MfiS7Ev6TYQct.F5IWcCZ4504rGsiVswGWWSYyma01QcZgmL+f+sf
oU18Hn6o6dXkMkFF14TL9rIAWE+6wvGV.p.TPqz3HK5L+VxYxl4UmBKEjr.B
6zinuKI3C+D2Y7azIM6N7QL6t+jQyZxymK1ToAKqVsxjlGyjz2c1kTK3180h
kJEYkacWpv6lyp2VJTjWK47wHA6fyBOWxH9pUf6jUtZkLpNKW.9EeUBH3ymY
XSQlaqGrkQMGzp20adYSmIOGjIABo1xZyAWJtCX9tg6+HMuhMCPyx76ao+Us
UxmzUE79H8d2ZB1m1ztbnOa1mGeAq0awyK8a9UqBUc6pZolpzurTK232e5gp
aInVw8QIIcpaiNSJfY4Z+92Cs+Mc+mgg2cEsvGlLY6V+1kMuioxnB5VM+fsY
9vSu4WI1PMBGXye6KXvNuzmZTh7U9h5j6vvASdngPdgOFxycNL6ia1axUMmT
JIzebXcQCn3SKMf+4QCMmOZung+6xBCPLfwO8ngcEI52YJ1y7mx3CN9xKUYU
bg7Y1yXjlKW6SrZnguQdsSfOSSDItqv2jwJFjavc1vO7OigyBr2+gDYorRk1
HXZpVFfu2FxXkZtfp4RQqNkX5y2sya3YYL2iavWAOaizH+pw.Ibg8f1I9h3Z
2B79sNeOHvBOtfEalWsvyu0KMf015.AaROvZ7vv5AhnndfHLbTgjcCK1KlHv
gOk5B26OqrXjcJ005.QqCHn8fVTxnxfj93SfQiJlv8YV0VT9fVUwOOhSV3uD
eeqCUClbBPa.j3vWDoMZssNTzRNEnE6gYPXazZaMF921syaLWyAeBXvCESA8
ASi6Zyw8.RQi65J8ZsNx3ho93OhGWENtWpowepae4YhCFeLErOLENtXJrOSc
iadi39rf4hwc8xdhHz3gn3dBI7iDRlFe8huAfIZhq
-----------end_max5_patcher-----------


 */
[Get Code]
Processing 代码
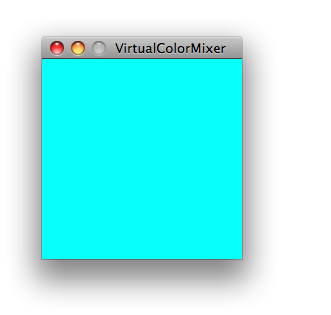
从上面的样例代码里复制processing程序。随着你改变模拟传感器的值,背景颜色会发生改变:

Max 代码
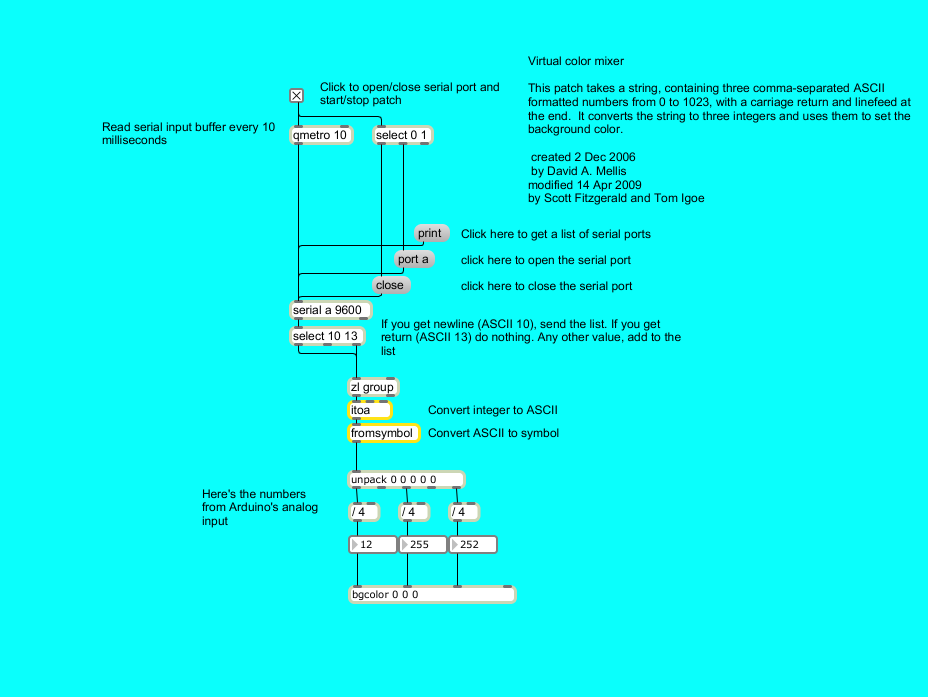
max程序看起来像这样。复制上面样例代码的文本,然后粘贴到新的Max窗口。

更多
- serial.begin()
- serial.print()
- analogRead()
- ASCIITable - 示范使用Arduino的高等的串口输出函数。
- Dimmer - 移动鼠标来改变LED灯的亮度
- Graph - 发送数据到电脑,然后在Processing里画出它的图表。
- Midi - 连续发送MIDI音符信息
- MultiSerialMega - 使能Arduino Mega上2个串口。
- PhysicalPixel - 通过从Processing或者Max/MSP发送数据到Arduino上,使LED开关。
- ReadASCIIString - 分析整数里一个用逗号分隔的字符串,来使一个LED灯褪色。
- SerialCallResponse - 通过一个呼-应的方法(握手)来发送多个变数
- SerialCallResponseASCII - 通过一个呼-应的方法(握手)来发送多个变数,并在发送前解码(ASCII)这些数值。
- SerialEvent - 使用SerialEvent()函数
- VirtualColorMixer - 从Arduino发送多个变数到你的电脑,然后在Processing或者Max/MSP上读取这些数据
获取最新文章: 扫一扫右上角的二维码加入“创客智造”公众号


