Arduino内置教程-数字-数字输入上拉
输入上拉
这个例子示范了用pinMode()来上拉输入引脚。在你的Arduino和电脑之间创建一个串口通讯来监视开关的状态。
总的来说,当输入为高电平,开发板上pin13的LED灯将会被打开;而为低电平时,这个LED灯将会熄灭。
硬件要求
- Arduino 开发板
- 即时开关,按键,或者切换开关
- 面包板
- 连接线
电路

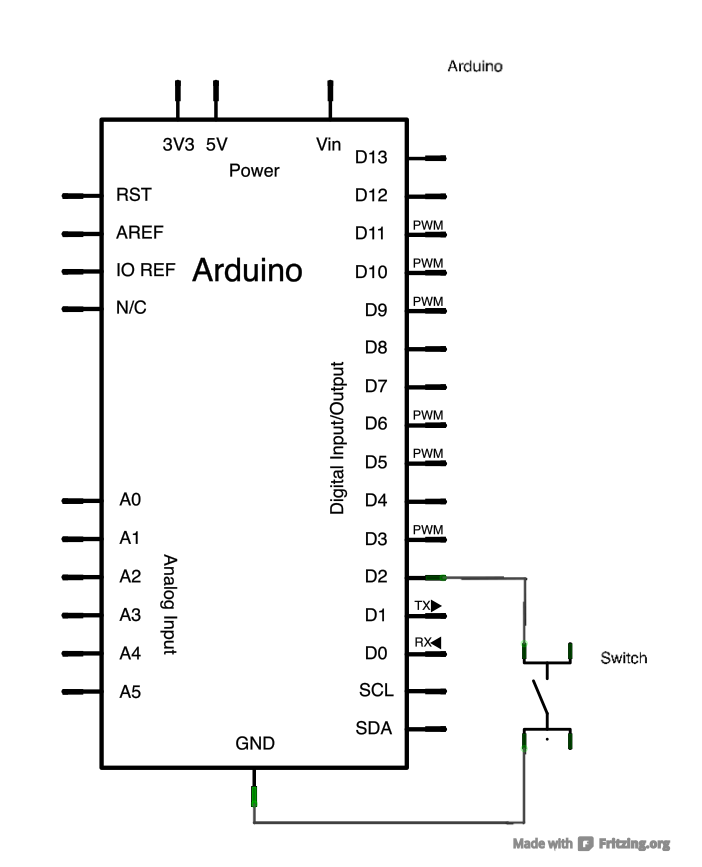
连接两根线到Arduino开发板。黑色线把地和按键的一个引脚连在一起。第二根线连接数字引脚pin 2到按钮的另一个引脚。
当你按下时,按钮或者开关连接电路的两点。按钮是断开的(未按),按钮两个引脚是没有接通的。因为pin2的内置上拉是正极且连接到5V,所以当按钮断开时我们读到的是高电平。当按钮是闭合的,因为pin2连接到地,所以Arduino读到低电平.
原理图

样例代码
- 在下面程序里,最先做的事是在你的开发板和电脑之间建立串口通讯,波特率为9600 bits:
Serial.begin(9600);
- 然后,初始化数字引脚pin2,因为你要读取按钮的输出,所以这个作为输入引脚:
pinMode(2,INPUT_PULLUP);
- 把作为LED灯的pin13初始化为输出引脚:
pinMode(13, OUTPUT);
现在初始化完成了,移入你代码的主循环里。当按钮被按下,5V电压会流过你的电路,而当它没有被按下,这个输入引脚就会链接到通过10k ohm电阻连接到地。这是数字输入,意味着开关只有开(1,或者高电平)和关(0,或者低电平)的状态,中间什么都没有。
在主循环里最先做的事创建一个变量来保存来自开关的信息。因为这部分的信息是“1”或者“0”,所以你可以用int数据类型。调用变量的感应值,然后使它赋值给数字引脚pin2。你可以用下面一句代码来完成上面步骤:
int sensorValue = digitalRead(2);
- 一旦开发板读取输入引脚,把其信息作为一个十进制的值(DEC)打印到电脑。你可以用command Serial.println()来完成这个步骤:
Serial.println(sensorValue, DEC);
- 现在,当你打开Arduino IDE的串口监视器,你会看见“0”的数据流(如果开关打开)或者“1”的数据流(如果开关闭合)
当开关为高电平时,pin13的LED灯会变亮;开关为低电平时,LED灯熄灭
/*
 Input Pullup Serial

 This example demonstrates the use of pinMode(INPUT_PULLUP). It reads a
 digital input on pin 2 and prints the results to the serial monitor.

 The circuit:
 * Momentary switch attached from pin 2 to ground
 * Built-in LED on pin 13

 Unlike pinMode(INPUT), there is no pull-down resistor necessary. An internal
 20K-ohm resistor is pulled to 5V. This configuration causes the input to
 read HIGH when the switch is open, and LOW when it is closed.

 created 14 March 2012
 by Scott Fitzgerald

 http://www.arduino.cc/en/Tutorial/InputPullupSerial

 This example code is in the public domain

 */

void setup() {
  //start serial connection
  Serial.begin(9600);
  //configure pin2 as an input and enable the internal pull-up resistor
  pinMode(2, INPUT_PULLUP);
  pinMode(13, OUTPUT);

}

void loop() {
  //read the pushbutton value into a variable
  int sensorVal = digitalRead(2);
  //print out the value of the pushbutton
  Serial.println(sensorVal);

  // Keep in mind the pullup means the pushbutton's
  // logic is inverted. It goes HIGH when it's open,
  // and LOW when it's pressed. Turn on pin 13 when the
  // button's pressed, and off when it's not:
  if (sensorVal == HIGH) {
    digitalWrite(13, LOW);
  } else {
    digitalWrite(13, HIGH);
  }
}
更多
- setup()
- loop()
- pinMode()
- digitalRead()
- delay()
- int
- serial
- DigitalPins
- Blink Without Delay: 不用delay()函数,使LED灯闪烁
- Button: 用一个按钮来控制LED灯
- Debounce: 读取一个按钮,并滤掉噪音
- Button State Change: 记录按键按下的次数
- Input Pullup Serial: 示范怎么用pinMode()来上拉引脚
- Tone: play 用压电扬声器弹奏一个旋律
- Pitch follower: 用模拟输入来操作压电扬声器弹奏一个高音
- Simple Keyboard: 一个用压力传感器和压电扬声器的三键音乐键盘
- Tone4: 用tone()命令在多个扬声器上发音
获取最新文章: 扫一扫右上角的二维码加入“创客智造”公众号


